 FA+
FA+
6553
Views
Views
278
Favorites
Favorites
Category
Photography / All
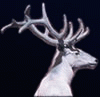
Species Dog (Other)
Size 1280 x 1280
File Size 367.1 kB
Report this content
More from Blotch


Here's a ginormous file with photos of various stages of the Bad Puppy Boxers piece.
In a nutshell, I stretched the paper, painted the under lying washes of shadow in watercolour, then added charcoal and chalk for a change of pace.
Aaand here's the finished piece: click
In a nutshell, I stretched the paper, painted the under lying washes of shadow in watercolour, then added charcoal and chalk for a change of pace.
Aaand here's the finished piece: click
Category Photography / All
Species Dog (Other)
Size 1280 x 1280px
File Size 367.1 kB


that made my mind cry.
So did the beauty of the detailing shots *swoon*, but that was a joyful mind-tear.
Imagining scanning that a bajillion times makes my mind cry in agony. I've never been able to scan in pieces and get the pieces to color-match correctly. >.<. How do you do it?
So did the beauty of the detailing shots *swoon*, but that was a joyful mind-tear.
Imagining scanning that a bajillion times makes my mind cry in agony. I've never been able to scan in pieces and get the pieces to color-match correctly. >.<. How do you do it?
Thank you! I'm sorry I made your brain leak internally. >;]
As for question:
Basically I scanned it in 6 pieces on the default setting and pieced them together in Photoshop. Each chunk is it's own layer and I make them semi-transparent to line them up (rotating the wonky ones until they are all in synce), then I make them all opaque and use a fuzzy-edged eraser at maybe %60 opacity to sort of blur the edges where they look jagged. Once it all looks good I flatten it then colour correct it. If your scanner is being lame and making all the chunks look different colours then you can usually switch your scanners setting so that it isn't level/colour-correcting and get them all to look the same. :D
Anyhow! It's pretty tedious all around, and doesn't really work unless you are scanning large pieces of paper. (if you scan wood it just looks awful because it cannot be flat on the scanner.
ah! Thank you :D
I have a pretty big project coming up, and I would like to scan it, but had such horrible experiences with trying to do it in the past XD. (I've drawn small purposely, just so I don't have to fool with it.)
I'm going to poke around my scanner settings, just so I know /how/ to turn off the level/color correcting. It usually pissed me off just a tad because it would scan my color work *slightly* different colors every scan.
Oh and some colors it just totally botches, like lavender. It totally cannot pick that up. It's like, "Oh, ultramarine? alright!" </tangent>

It may also be that your scanner is picking up on the red in certain color blends. I don't remember exactly where I read it, but I recall seeing somewhere that a lot of scanners out there are set to botch certain reds or other hues because it's required by law (so it's harder to make forgeries).
Thank you for the info. That is totally lame, I mean it makes sense (kinda) for the forgery reason, though for anyone trying to use the scanner in hopes of color-matching it is a bum deal.
BUT, do the really high grade scanners still have the same issue?
I have a Cannon Pixma MP460 (All-in-One), I may consider getting a higher grade of scanner, if I can get the scans closer to my actual drawings.
BUT, do the really high grade scanners still have the same issue?
I have a Cannon Pixma MP460 (All-in-One), I may consider getting a higher grade of scanner, if I can get the scans closer to my actual drawings.
Actually, not sure. I've been using an old Canon slimline scanner for several years now (I want to say mine is the CanoScan 650U, but I don't have it in front of me right now), and really, I just use Photoshop to adjust some of the levels and color balance to an acceptable level of similarity.
I will say though, generally any standalone scanner does a MUCH better job at scanning than the all-in-ones that act as printer, scanner, fax and whatever else they try to cram into a single machine. Had one of those once and it was just awful for scanning artwork. The people whom those scanners are made for are people who run home offices with a need for space efficiency; there just does not seem to be much concern for much quality above 'it's in the computer and it's still reasonably legible'.
I will say though, generally any standalone scanner does a MUCH better job at scanning than the all-in-ones that act as printer, scanner, fax and whatever else they try to cram into a single machine. Had one of those once and it was just awful for scanning artwork. The people whom those scanners are made for are people who run home offices with a need for space efficiency; there just does not seem to be much concern for much quality above 'it's in the computer and it's still reasonably legible'.
ah, I think I will try for single units then, I will probably shop around for a good scanner and printer, I was looking through the comments here and it seems  blotch also uses a cannon, so I think I will stick with the brand.
 blotch also uses a cannon, so I think I will stick with the brand.
Do you have CS3?
Cause you might be able to save yourself a ton of work:
http://photoshopcafe.com/cs3/smith-aa.htm
Cause you might be able to save yourself a ton of work:
http://photoshopcafe.com/cs3/smith-aa.htm
I've used the panorama features with Photoshop before (mostly in the past for stitching together photos for a complete wrap around image for 3D Studio Max.) It's neat and a time saver for that, but for art--especially things I'm working on high res so I can print high quality--it's much better to sit down and take the 20min and do it by hand. :]


I might possibly have to try doing something like that in the future and it's nice to know tips and tricks to help with such. The pic looks amazing and I am reminded of my enjoyment of charcoals as well.... very nice work. *applauds and gives kudos where it's due*

*takes notes* I'll have try this with the next big piece I have to scan. I've always had a hell of a time with piecing things back together.
Might I ask what kind of scanner you have? I can fumble around with mine enough that the color correction isn't a problem, but I've been searching high and low for a new one that is truly flatbed. Most scanners (including what I've got now) have the glass indented just so.. and it ends up leading to shadows and distortions when you're trying to piece it together. Could be I'm just impatient with the whole process, though. :B
Might I ask what kind of scanner you have? I can fumble around with mine enough that the color correction isn't a problem, but I've been searching high and low for a new one that is truly flatbed. Most scanners (including what I've got now) have the glass indented just so.. and it ends up leading to shadows and distortions when you're trying to piece it together. Could be I'm just impatient with the whole process, though. :B
I have a Canon LIDE90--in my opinion, Canon's can't be beat when it comes to affordable scanners. They do a good job of getting the color (though all scanners have issues with the color green,) and are cheap enough to replace every few years when they start to wear down.
Mine also has the slight little inset, which tends to make me have to scan something once or twice extra to clear up any blurriness. I paint on watercolor paper, so its easy to set it on the scanner with a book ontop of it to keep it held down. If your using something like illustration board---I guess I'd say continue the search for the truly flatbed. ;]
Mine also has the slight little inset, which tends to make me have to scan something once or twice extra to clear up any blurriness. I paint on watercolor paper, so its easy to set it on the scanner with a book ontop of it to keep it held down. If your using something like illustration board---I guess I'd say continue the search for the truly flatbed. ;]
I think every scanner on earth is programmed to despise something in the blue spectrum. Mine has issues with anything indigo/purple. Maybe it's an Epson thing? I'll have to try a Canon when I get my next one. The ol' girl's on her way out, but with luck I can push her through for another month until graduation.
Curses! D: My illustration board is betraying me. It's about time that I actually invested in a decent chunk of gator board and some good watercolor paper anyway.. but I was hoping I'd find a way around it. I can't help it, I loves me some board. <3 Feels good under my brushes. My own artistic OCD tells me that my working surface must be as smooth as humanly possible. I find the board less likely to try and crinkle up on me. (Of course, I always keep my hair dryer nearby to help with that. xD)
Curses! D: My illustration board is betraying me. It's about time that I actually invested in a decent chunk of gator board and some good watercolor paper anyway.. but I was hoping I'd find a way around it. I can't help it, I loves me some board. <3 Feels good under my brushes. My own artistic OCD tells me that my working surface must be as smooth as humanly possible. I find the board less likely to try and crinkle up on me. (Of course, I always keep my hair dryer nearby to help with that. xD)


lol i like the multimedia thing you have going here, and it's really effective. I'm seriously in aw with the details that you put into the ripped fabric of the sofa too, but the underlying wash and highlights of the chalk really make it pop with the dramatic contrasts :) Amazing job.


That it is! And also very, very messy. :o I don't think my hands will ever be clean again after surviving foundation year at an art institution, ahaha. But it's all in good fun. <3 Lovely use of the medium with this piece, for sure! The fur texturing is to die for, I'm surprised you managed to make it so consistent in only 6 hours. :o Du bist Meister uber alles Kunzt, ya?

That's excellent, love the way you post up these in-progress shots. I love to see the range of media you use to get the effects you're aiming for. Somehow I never made the connection that a lot of your work must be in larger format like this! The worn out sofa is a great visual, really suits the piece not being coloured. Also love the crotch-shot right in the middle *grins*


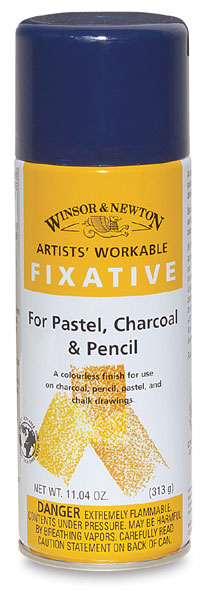
I broke down and ended up getting a can of Fixitive (http://www.dick-blick.com/items/217.....1001-3ww-l.jpg). I don't really like using it on paintings or graphite but it's really nice for charcoal when you get to the point where you can't work on anything without smudging it all over. At that point I'd just add a layer of fixative, let it dry, and continue on! ;D


(hugs you really tight) i've been wanting to do large art again for a long time, but i could never think of how to use the scanner for it... but the way you've been saying that you do it, makes me feel kinda dumb for not thinking of it too (giggles) thank you!
oh and this is really good my friend!!
oh and this is really good my friend!!


Now that's progress. ;)
You really do have a number of different methods you use to get to the finished stage, and it's interesting to see how you mix the various mediums. Every piece is still distinctly 'yours' but it still has the subtle differences the technique gives. I imagine being so versatile in your methods opens up a lot of options, but do you choose a certain one that fits the piece best, or is it more a matter of using the method you feel most interested in doing at the time?
You really do have a number of different methods you use to get to the finished stage, and it's interesting to see how you mix the various mediums. Every piece is still distinctly 'yours' but it still has the subtle differences the technique gives. I imagine being so versatile in your methods opens up a lot of options, but do you choose a certain one that fits the piece best, or is it more a matter of using the method you feel most interested in doing at the time?
Hey Moonstalker! :D
Usually what medium I use is dictated by what I want the piece to end up looking like. The thought process is generally something like this: 'I want to make this in greyscale since it's for Heat and charcoal and chalk pastels are great for black and white contrast. They are a pain to use small-scale tho so it'll have to be a big piece and I want there to be water splotches in the light-beams so I'll put watercolour under it all, that'll help me get the detail I want in the fur too that I know I can pull off with paint but will be pretty hard to do in charcoal--and since it's due in a day I'll do that because I know it will work and it will get done in time.' ;]
Usually what medium I use is dictated by what I want the piece to end up looking like. The thought process is generally something like this: 'I want to make this in greyscale since it's for Heat and charcoal and chalk pastels are great for black and white contrast. They are a pain to use small-scale tho so it'll have to be a big piece and I want there to be water splotches in the light-beams so I'll put watercolour under it all, that'll help me get the detail I want in the fur too that I know I can pull off with paint but will be pretty hard to do in charcoal--and since it's due in a day I'll do that because I know it will work and it will get done in time.' ;]


Oh yeah, I'd definitely be all over a pair of underwear like that if they were in stores. Sadly, Wal-Mart lacks quite a bit in the novelty department, and Kohl's seems to appeal to the Family Guy audience more than anything else, sooo... yeah. But beautiful work, really. Inspiring and motivational, yet sadly depressing at the same time. Guh, gotta look into some serious art schooling when I get back to the states.


I would just like to say, I adore your art, it's absolutely amazing and I honestly think that you are the best artist on the web, I think it's so kind that you reply to comments and answer our questions as a lot of great artists on the internet just ignore everyone that isnt " up to thier standards". I also really appreciate the tutorials you have been doing, I really liked the one you did for the body proportions etc. and was wondering when the next one would be out? and would you maybe be willing to do a paw and hand tutorial as thats where I struggle a lot in drawing. I'm sorry if I sound fan-girlish but thats what I feel about your talent ^^


I already Faved the original, but I can't help but be amazed at the quality and the originality of each of your individual pieces. There is clearly a real 'Blotch' feel to all of em, yet they all have something unique.
Where do you get your ideas for poses and such from? Brainstorming with friends, something you see somewhere? That sorta thing?
Great art this! Kudos!
Where do you get your ideas for poses and such from? Brainstorming with friends, something you see somewhere? That sorta thing?
Great art this! Kudos!


Well...because everybody has to reply when you post, so will I! :D
Actually, very cool to see a WIP series. Get the whole mentality of the work process down. Very nicely done :) Art is great, we can do it from wherever we chose. Makin suits atm in a friends livingroom while on vacation, for example ^.^
Actually, very cool to see a WIP series. Get the whole mentality of the work process down. Very nicely done :) Art is great, we can do it from wherever we chose. Makin suits atm in a friends livingroom while on vacation, for example ^.^


Comments