 FA+
FA+

Ghostbustin' for The sake of it? [Stage 4]
General | Posted 13 years agoOHH KAYY then.
So I missed the spooky time of the year. It matters not, the uniform alone turned heads at work. But now is the time to move on to completing the pack and wand. firstly I've taken the wand kit bought from Nick-A-Tron props and assembled it.
http://i225.photobucket.com/albums/.....ps0f11d8e8.jpg
A few hours of painting and waiting and we have this..
http://i225.photobucket.com/albums/.....ps1cfae427.jpg
http://i225.photobucket.com/albums/.....psbba1f22f.jpg
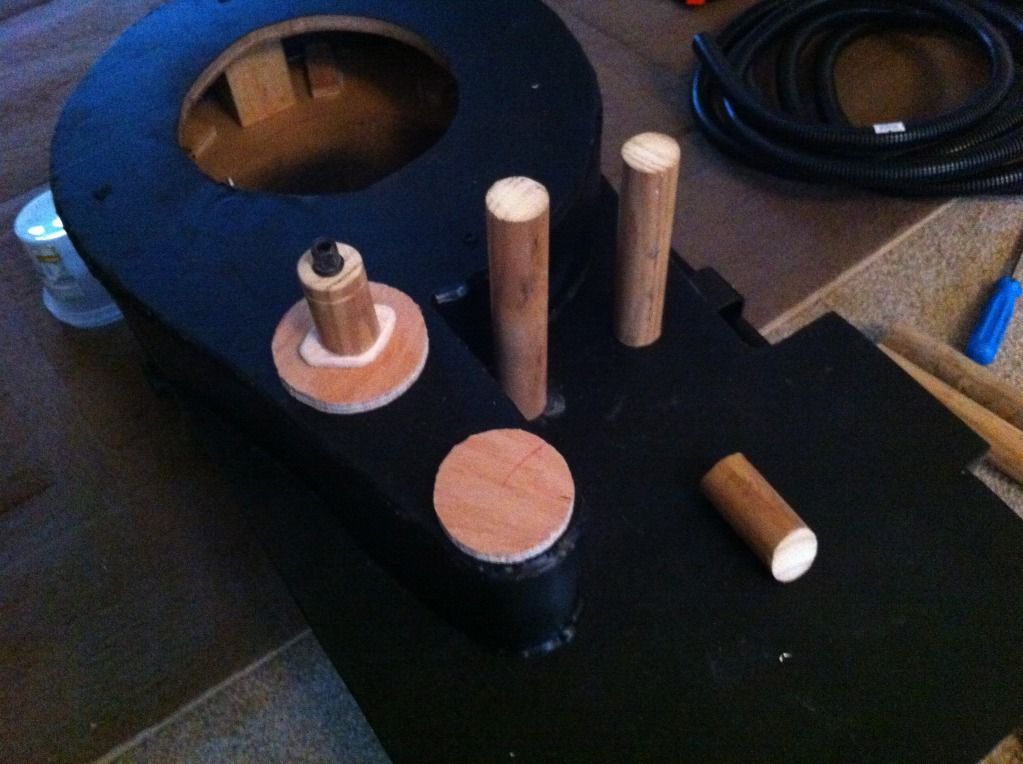
Adding more and more painted parts...
http://i225.photobucket.com/albums/.....ps9450cb61.jpg
http://i225.photobucket.com/albums/.....psc4e27aed.jpg
Finally Stickers and hose...
http://i225.photobucket.com/albums/.....ps8c82ee93.jpg
http://i225.photobucket.com/albums/.....ps8cddcc0b.jpg
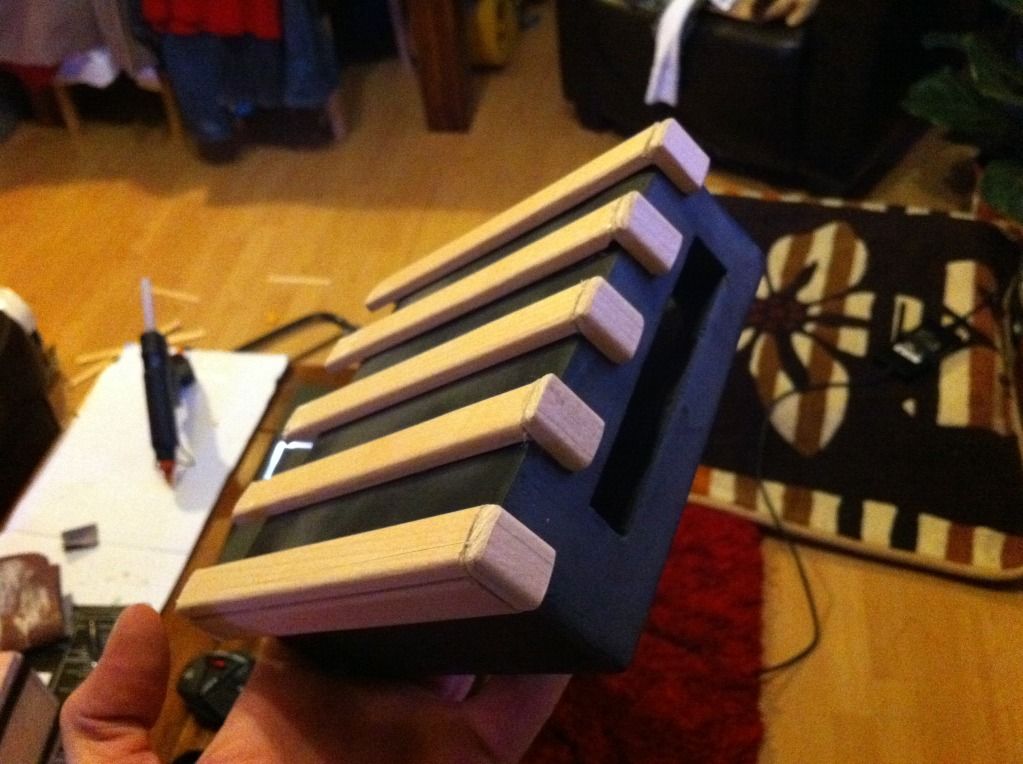
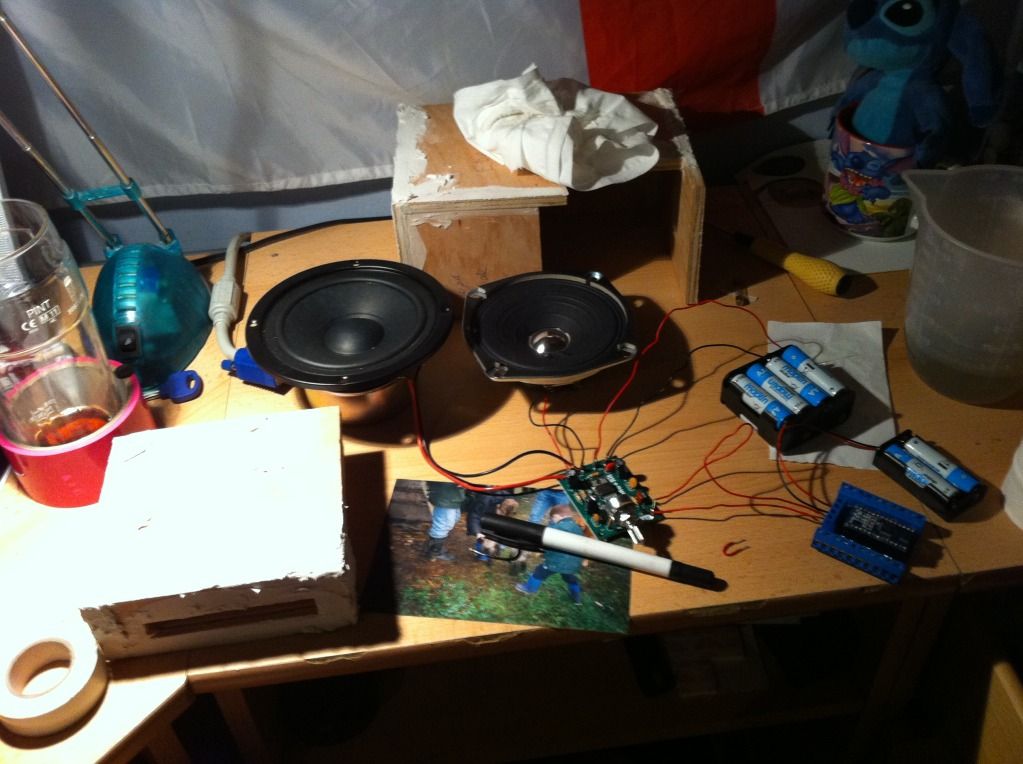
Now then... Electronics...
Here's a test video of the electronics kit for both the pack and wand...
http://www.youtube.com/watch?v=f6Yr7z5KILk
I started by sticking the main pack lights in roughly and testing what they might look like. it's starting to go well..
http://i225.photobucket.com/albums/.....psb3ecaa61.jpg
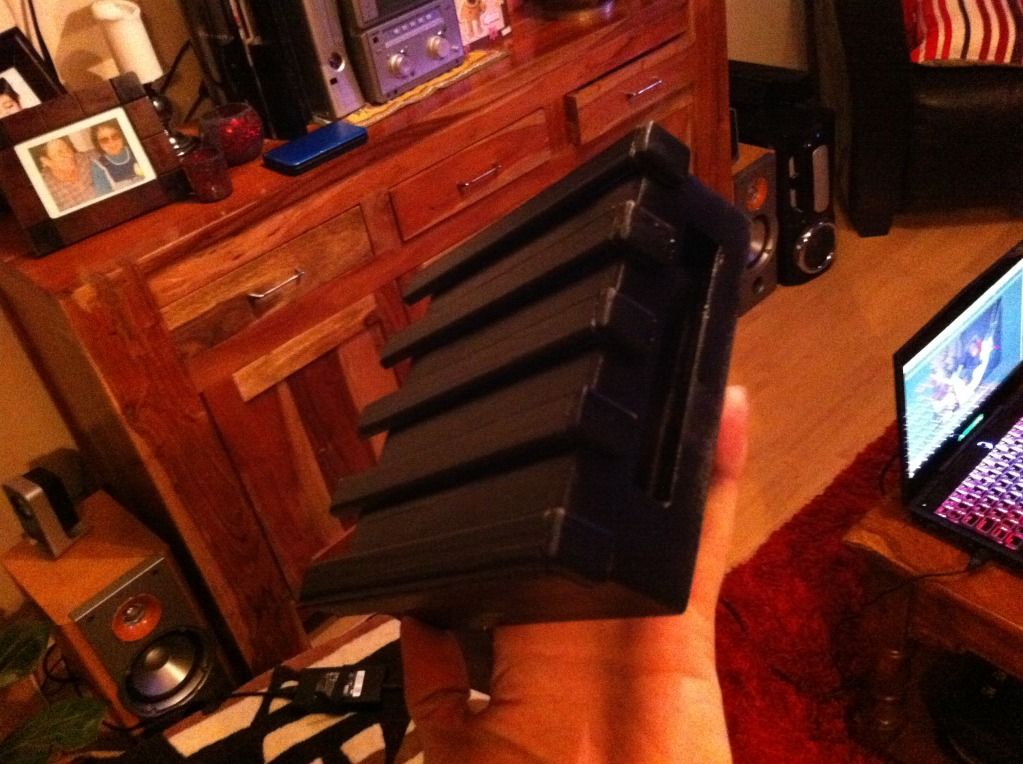
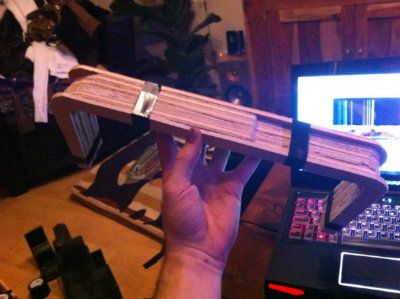
so knowing that it looks ok I get back to the wand itself.
http://i225.photobucket.com/albums/.....ps3d3cf770.jpg
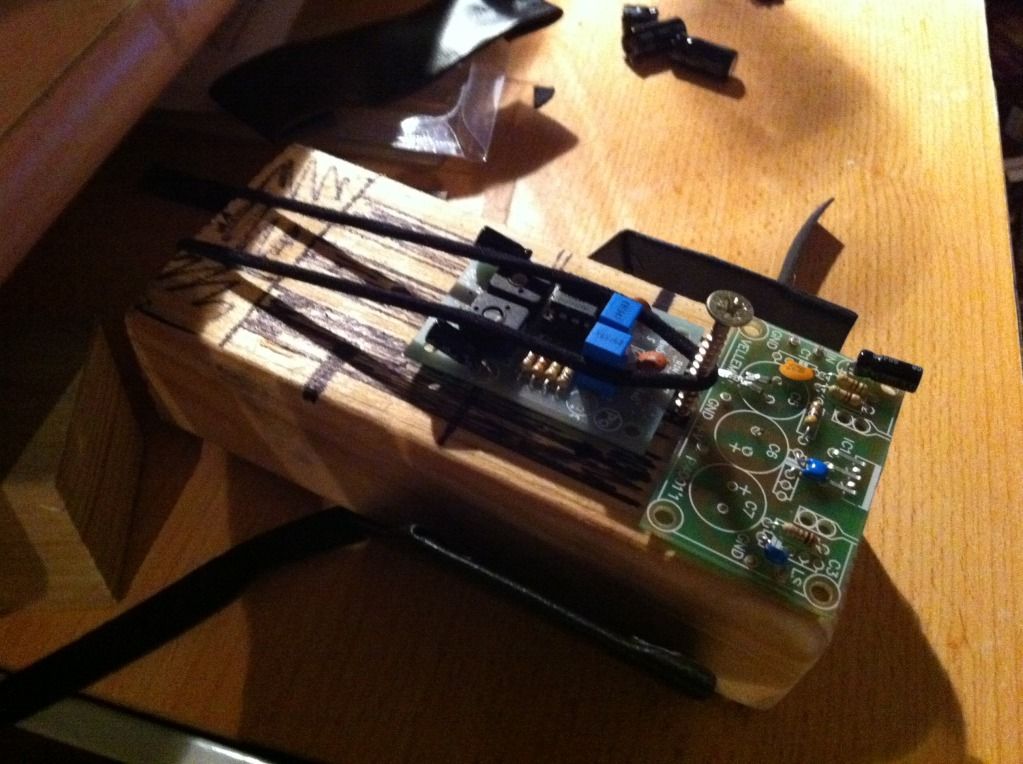
I decided to use 1.5mm 4 core flex to bring power and sound the the switches here. it's a complete mess. Using a continuity test on my electrician's mate the voltage meter I tested each circuit from switch to switch making sure sound tracks did not mix with power tracks. that would be lethal to the sound board...
YAY most of it finally installed! well everything except the yellow power bar. Still need to hookup the power tracks for it before it goes in.
http://i225.photobucket.com/albums/.....ps3fcbaae9.jpg
Power lines now installed and the sound cables set in place. I put the last of the kit together and took a short video.
http://www.youtube.com/watch?v=mdARoB-GVqk
==============================================================
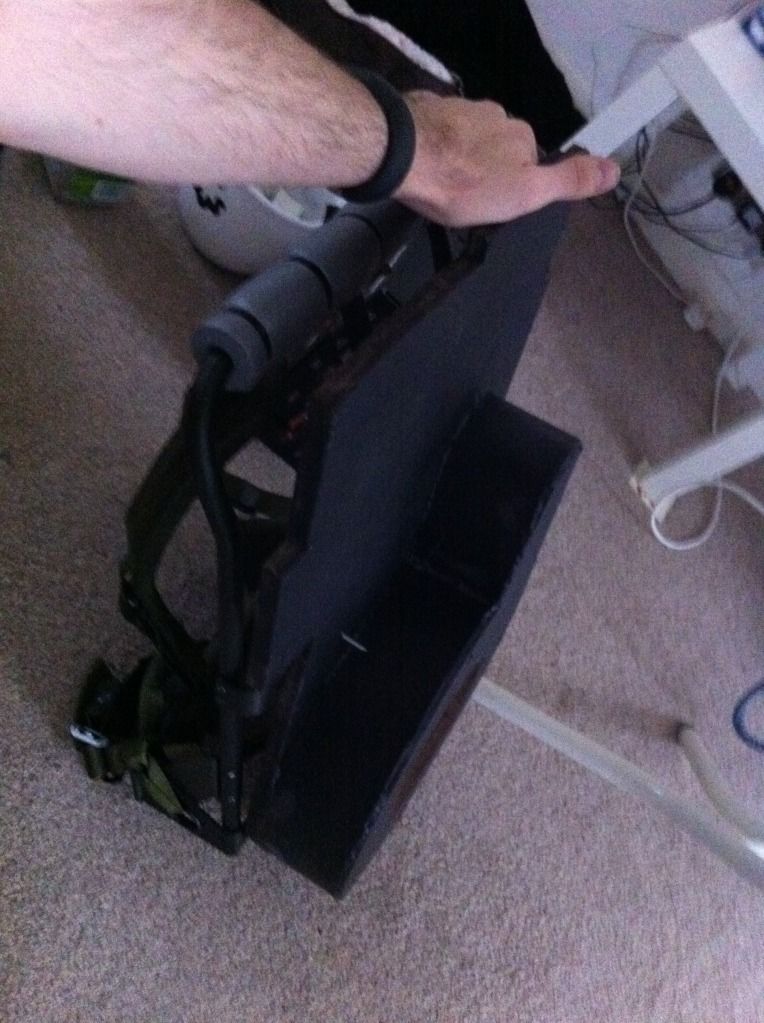
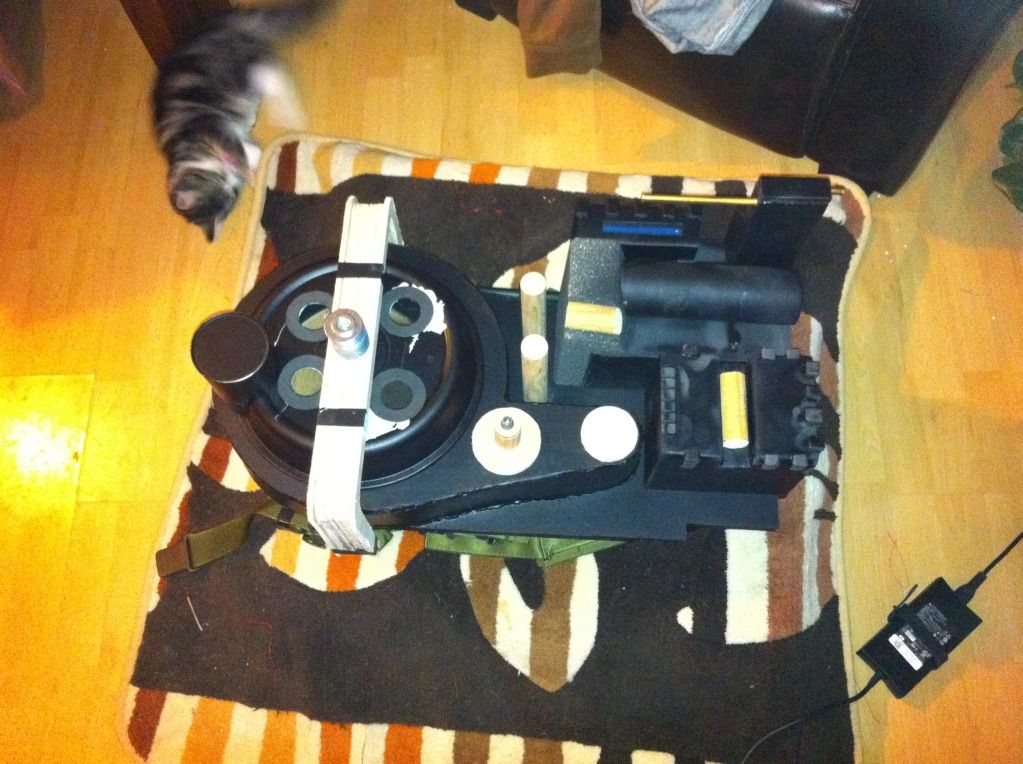
NOW with that done time to put a bit more into the main pack. I started by giving the main parts and backing new coats of paint, adding a new style vacuum line hose and adding some extra parts...
http://i225.photobucket.com/albums/.....ps181a2a47.jpg
http://i225.photobucket.com/albums/.....psda8fa999.jpg
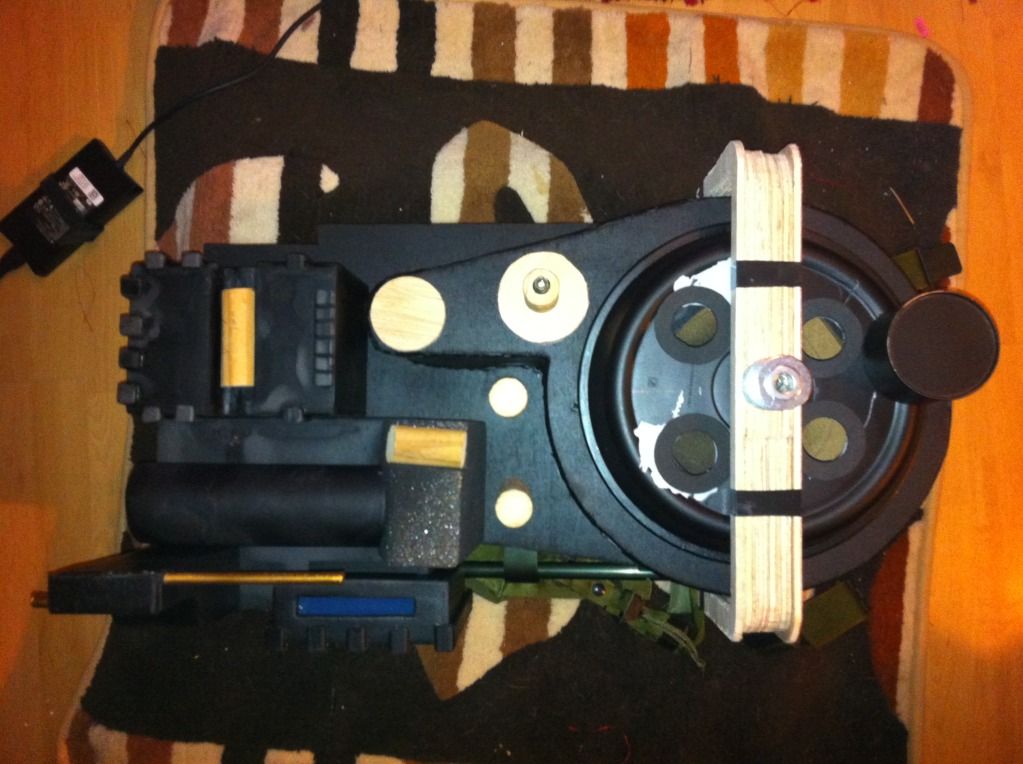
After a few further tweaks and bolts I've ended the night's build with this...
http://i225.photobucket.com/albums/.....ps3271c366.jpg
So I missed the spooky time of the year. It matters not, the uniform alone turned heads at work. But now is the time to move on to completing the pack and wand. firstly I've taken the wand kit bought from Nick-A-Tron props and assembled it.
http://i225.photobucket.com/albums/.....ps0f11d8e8.jpg
A few hours of painting and waiting and we have this..
http://i225.photobucket.com/albums/.....ps1cfae427.jpg
http://i225.photobucket.com/albums/.....psbba1f22f.jpg
Adding more and more painted parts...
http://i225.photobucket.com/albums/.....ps9450cb61.jpg
http://i225.photobucket.com/albums/.....psc4e27aed.jpg
Finally Stickers and hose...
http://i225.photobucket.com/albums/.....ps8c82ee93.jpg
http://i225.photobucket.com/albums/.....ps8cddcc0b.jpg
Now then... Electronics...
Here's a test video of the electronics kit for both the pack and wand...
http://www.youtube.com/watch?v=f6Yr7z5KILk
I started by sticking the main pack lights in roughly and testing what they might look like. it's starting to go well..
http://i225.photobucket.com/albums/.....psb3ecaa61.jpg
so knowing that it looks ok I get back to the wand itself.
http://i225.photobucket.com/albums/.....ps3d3cf770.jpg
I decided to use 1.5mm 4 core flex to bring power and sound the the switches here. it's a complete mess. Using a continuity test on my electrician's mate the voltage meter I tested each circuit from switch to switch making sure sound tracks did not mix with power tracks. that would be lethal to the sound board...
YAY most of it finally installed! well everything except the yellow power bar. Still need to hookup the power tracks for it before it goes in.
http://i225.photobucket.com/albums/.....ps3fcbaae9.jpg
Power lines now installed and the sound cables set in place. I put the last of the kit together and took a short video.
http://www.youtube.com/watch?v=mdARoB-GVqk
==============================================================
NOW with that done time to put a bit more into the main pack. I started by giving the main parts and backing new coats of paint, adding a new style vacuum line hose and adding some extra parts...
http://i225.photobucket.com/albums/.....ps181a2a47.jpg
http://i225.photobucket.com/albums/.....psda8fa999.jpg
After a few further tweaks and bolts I've ended the night's build with this...
http://i225.photobucket.com/albums/.....ps3271c366.jpg
Ghostbustin' for Halloween? [Stage 3]
General | Posted 13 years agoSo finally Things are starting to look like a finished piece. After a day or so of faffing around and being unproductive I've managed to dig back in and make real progress. This update is a big one. Firstly I added cosmetic plates to the powercell.
http://i225.photobucket.com/albums/.....C/IMG_1103.jpg
Then Painted them..
http://i225.photobucket.com/albums/.....C/IMG_1105.jpg
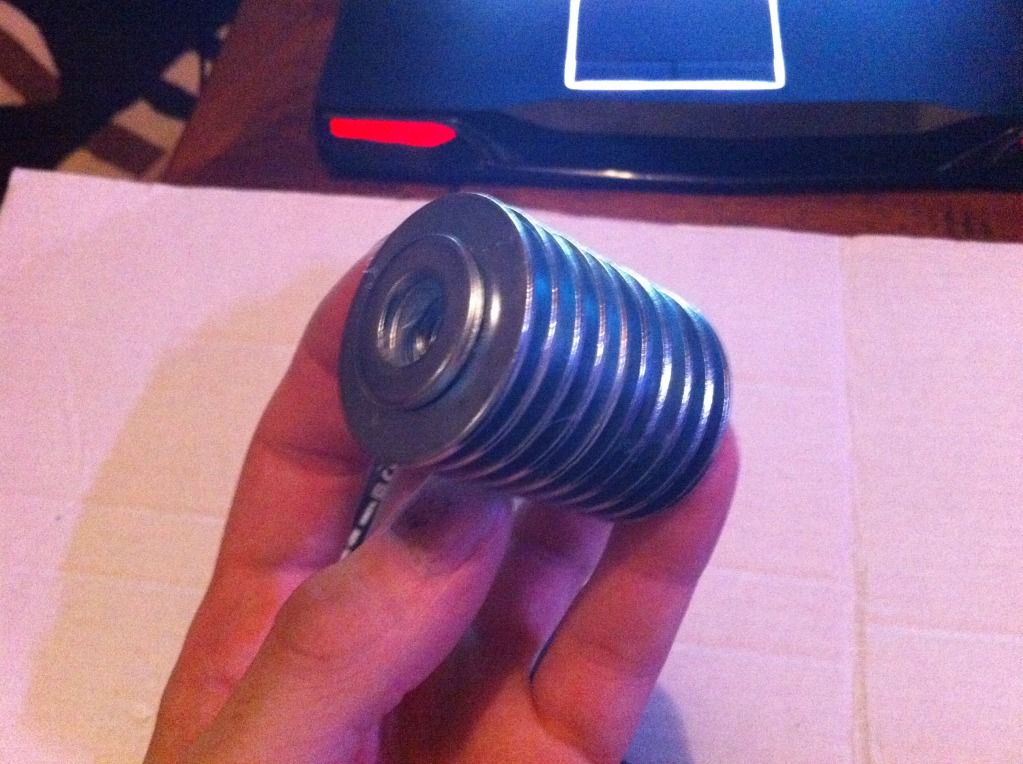
So now's the time to start on the Ion knob, made from some zink coated washers from homebase.
http://i225.photobucket.com/albums/.....C/IMG_1108.jpg
Added the lens to the powercell and tested it. Looks great.
http://i225.photobucket.com/albums/.....C/IMG_1110.jpg
Ok so the powercell is now ready. so time to work on the gearbox. Filling and sanding. My favorite game >.<
http://i225.photobucket.com/albums/.....C/IMG_1112.jpg
http://i225.photobucket.com/albums/.....C/IMG_1121.jpg
Added the rods to the ion arm, plus the cap end. Still need to sink bolts into it.
NOW time to bolt the ALICE frame into the motherboard. Got it lined up right and it looks great.
http://i225.photobucket.com/albums/.....C/IMG_1123.jpg
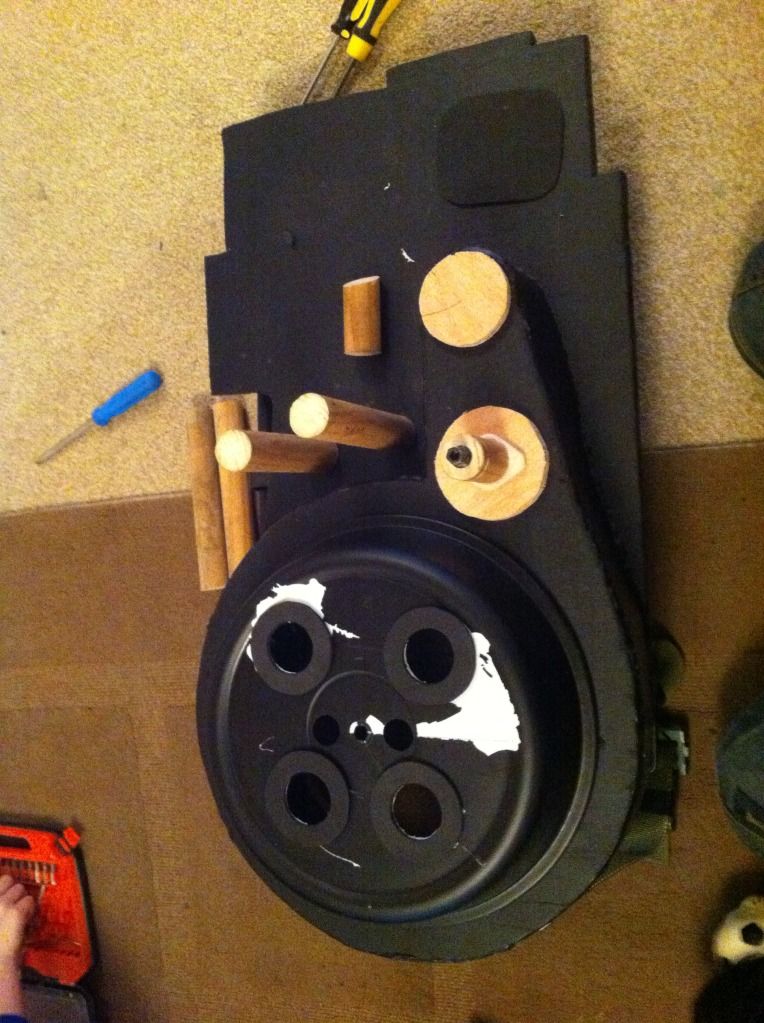
knocked up the filler plug, beam line, cosmetic plates for the generator cover and fashioned a clippard valve from wood :3
http://i225.photobucket.com/albums/.....C/IMG_1126.jpg
Drilled the holes in the cyclotron plate. it took off some paint but that's ok. can always repaint it.
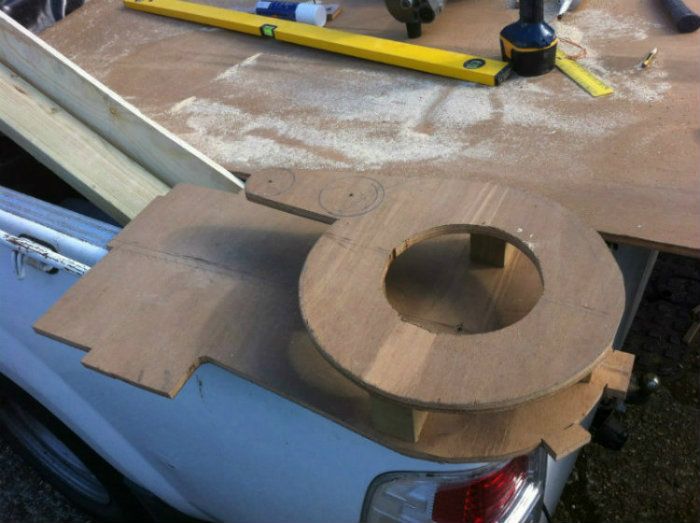
the added parts look great. Now that the gearbox is ready I've added the cosmetic plates and given it a few coats of paint.
http://i225.photobucket.com/albums/.....C/IMG_1133.jpg
Now then. I've cobbled it all together to see how it looks at this stage. And here we are.. the next three photos are different angles..
http://i225.photobucket.com/albums/.....C/IMG_1135.jpg
http://i225.photobucket.com/albums/.....C/IMG_1134.jpg
http://i225.photobucket.com/albums/.....C/IMG_1136.jpg
http://i225.photobucket.com/albums/.....C/IMG_1128.jpg
So. After stage 3 everything is starting to really look nice. A few more parts, a few more stages and Everything will be ready for final touches and electronics.
Next stage; Final part. Lights, sound, stickers and hoses!
Thanks for reading! :3
http://i225.photobucket.com/albums/.....C/IMG_1103.jpg
Then Painted them..
http://i225.photobucket.com/albums/.....C/IMG_1105.jpg
So now's the time to start on the Ion knob, made from some zink coated washers from homebase.
http://i225.photobucket.com/albums/.....C/IMG_1108.jpg
Added the lens to the powercell and tested it. Looks great.
http://i225.photobucket.com/albums/.....C/IMG_1110.jpg
Ok so the powercell is now ready. so time to work on the gearbox. Filling and sanding. My favorite game >.<
http://i225.photobucket.com/albums/.....C/IMG_1112.jpg
http://i225.photobucket.com/albums/.....C/IMG_1121.jpg
Added the rods to the ion arm, plus the cap end. Still need to sink bolts into it.
NOW time to bolt the ALICE frame into the motherboard. Got it lined up right and it looks great.
http://i225.photobucket.com/albums/.....C/IMG_1123.jpg
knocked up the filler plug, beam line, cosmetic plates for the generator cover and fashioned a clippard valve from wood :3
http://i225.photobucket.com/albums/.....C/IMG_1126.jpg
Drilled the holes in the cyclotron plate. it took off some paint but that's ok. can always repaint it.
the added parts look great. Now that the gearbox is ready I've added the cosmetic plates and given it a few coats of paint.
http://i225.photobucket.com/albums/.....C/IMG_1133.jpg
Now then. I've cobbled it all together to see how it looks at this stage. And here we are.. the next three photos are different angles..
http://i225.photobucket.com/albums/.....C/IMG_1135.jpg
http://i225.photobucket.com/albums/.....C/IMG_1134.jpg
http://i225.photobucket.com/albums/.....C/IMG_1136.jpg
http://i225.photobucket.com/albums/.....C/IMG_1128.jpg
So. After stage 3 everything is starting to really look nice. A few more parts, a few more stages and Everything will be ready for final touches and electronics.
Next stage; Final part. Lights, sound, stickers and hoses!
Thanks for reading! :3
Ghostbustin' for Halloween? [Stage 2]
General | Posted 13 years agoUpdate time!
So after much drawing out, cutting and gluing. I finally have some bits ready for the filling and sanding stage. It all seems to be going rather well. Photos should show ya what I mean...
New amplifier unit showed up yesterday too so was testing that... 120db. That sounds more like it!
http://i225.photobucket.com/albums/.....C/IMG_1080.jpg
http://i225.photobucket.com/albums/.....C/IMG_1084.jpg
http://i225.photobucket.com/albums/.....C/IMG_1083.jpg
Started more work on the frame and Cyclotron cover. New newly painted and weld lined. Pringles can bought purely for the N filter base.
http://i225.photobucket.com/albums/.....C/IMG_1078.jpg
http://i225.photobucket.com/albums/.....C/IMG_1079.jpg
and together..
http://i225.photobucket.com/albums/.....C/IMG_1087.jpg
http://i225.photobucket.com/albums/.....C/IMG_1088.jpg
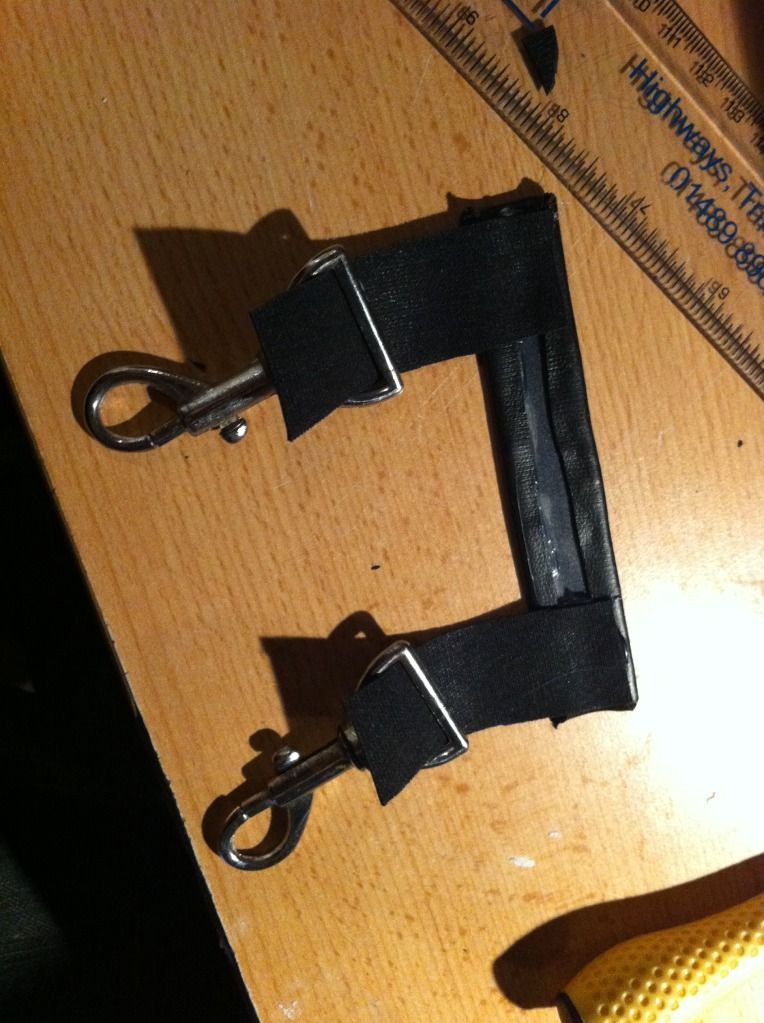
Whilst all this dried I thought about wearing the Trap pedal and hose on the main kit belt. So I added clip hooks to the pedal itself and a new belt clipset.
http://i225.photobucket.com/albums/.....C/IMG_1089.jpg
http://i225.photobucket.com/albums/.....C/IMG_1090.jpg
Finished!
http://i225.photobucket.com/albums/.....C/IMG_1095.jpg
PLANS AND MESS >.<
http://i225.photobucket.com/albums/.....C/IMG_1094.jpg
I decided I really like the design of the ghostbusters video game PASS alarm. So begins the work in replicating it..
http://i225.photobucket.com/albums/.....C/IMG_1092.jpg
By the end of that night this is what I had.
http://i225.photobucket.com/albums/.....C/IMG_1091.jpg
OK! new day new tasks. Spent the morning looking for new things to use on the pack. Found some bits that will prove very useful in the coming week. Filled and sanded down the last few parts to the top left assembly of the pack. Only the booster rail and beading left to go till the final touches can be put into place. After which I can start channeling for the electronics to be installed.
Got the Lighting system and sound up and running. Check the vid below for the progress!
http://www.youtube.com/watch?v=f6Yr7z5KILk&feature=g-upl
So. Then comes the daunting task of starting the bumper. After drawing it out in it's various layers I used a WORX multitool to cut each section out and glue them together. Held tight they are set aside to dry and stick. once complete I will begin filling and sanding prep.
http://i225.photobucket.com/albums/.....C/IMG_1096.jpg
http://i225.photobucket.com/albums/.....C/IMG_1097.jpg
Drawn out and cut, the Gearbox assy box has now been glued together but isn't holding too well so I will have to coat it in hot glue to get a more solid finish. This part needs to remain hollow in order for me to mount the amplifier and volume control.
Once that was complete I finished the sanding of the various parts for the top left gear section and gave them the first 2 layers of paint. Positioned them together and stood back to see how they look without the motherboard.
http://i225.photobucket.com/albums/.....C/IMG_1098.jpg
http://i225.photobucket.com/albums/.....C/IMG_1099.jpg
Well that was all the time I managed to grab this weekend. But over the week I will be adding more and more. Hopefully after next week a finished product and video will be on show!
So after much drawing out, cutting and gluing. I finally have some bits ready for the filling and sanding stage. It all seems to be going rather well. Photos should show ya what I mean...
New amplifier unit showed up yesterday too so was testing that... 120db. That sounds more like it!
http://i225.photobucket.com/albums/.....C/IMG_1080.jpg
http://i225.photobucket.com/albums/.....C/IMG_1084.jpg
http://i225.photobucket.com/albums/.....C/IMG_1083.jpg
Started more work on the frame and Cyclotron cover. New newly painted and weld lined. Pringles can bought purely for the N filter base.
http://i225.photobucket.com/albums/.....C/IMG_1078.jpg
http://i225.photobucket.com/albums/.....C/IMG_1079.jpg
and together..
http://i225.photobucket.com/albums/.....C/IMG_1087.jpg
http://i225.photobucket.com/albums/.....C/IMG_1088.jpg
Whilst all this dried I thought about wearing the Trap pedal and hose on the main kit belt. So I added clip hooks to the pedal itself and a new belt clipset.
http://i225.photobucket.com/albums/.....C/IMG_1089.jpg
http://i225.photobucket.com/albums/.....C/IMG_1090.jpg
Finished!
http://i225.photobucket.com/albums/.....C/IMG_1095.jpg
PLANS AND MESS >.<
http://i225.photobucket.com/albums/.....C/IMG_1094.jpg
I decided I really like the design of the ghostbusters video game PASS alarm. So begins the work in replicating it..
http://i225.photobucket.com/albums/.....C/IMG_1092.jpg
By the end of that night this is what I had.
http://i225.photobucket.com/albums/.....C/IMG_1091.jpg
OK! new day new tasks. Spent the morning looking for new things to use on the pack. Found some bits that will prove very useful in the coming week. Filled and sanded down the last few parts to the top left assembly of the pack. Only the booster rail and beading left to go till the final touches can be put into place. After which I can start channeling for the electronics to be installed.
Got the Lighting system and sound up and running. Check the vid below for the progress!
http://www.youtube.com/watch?v=f6Yr7z5KILk&feature=g-upl
So. Then comes the daunting task of starting the bumper. After drawing it out in it's various layers I used a WORX multitool to cut each section out and glue them together. Held tight they are set aside to dry and stick. once complete I will begin filling and sanding prep.
http://i225.photobucket.com/albums/.....C/IMG_1096.jpg
http://i225.photobucket.com/albums/.....C/IMG_1097.jpg
Drawn out and cut, the Gearbox assy box has now been glued together but isn't holding too well so I will have to coat it in hot glue to get a more solid finish. This part needs to remain hollow in order for me to mount the amplifier and volume control.
Once that was complete I finished the sanding of the various parts for the top left gear section and gave them the first 2 layers of paint. Positioned them together and stood back to see how they look without the motherboard.
http://i225.photobucket.com/albums/.....C/IMG_1098.jpg
http://i225.photobucket.com/albums/.....C/IMG_1099.jpg
Well that was all the time I managed to grab this weekend. But over the week I will be adding more and more. Hopefully after next week a finished product and video will be on show!
Ghostbustin' for Halloween? [Stage 1]
General | Posted 13 years agoAs stated in the title I have a screen accurate style Ghostbusters uniform with Proton pack in the works. I figured I should update it's progress via this here journal.
First off: BUDGET--
Not a cheap project I'll admit but certainly a rewarding one. I estimated the entire build to cost roughly £400
MATERIALS for Stage 1--
1 Sheet of marine Plywood @ 1/2" thickness
1 Standard length of 2x4 Plywood
1m of 2inch PVC pipe (white)
1m of 1inch PVC Pipe
1/2m squared plastic gutter sheeting
TOOLS for stage 1--
electric Jigsaw with spare blades
1800w Electric Chop Saw
Large Protractor
Long spirit level or straight edge.
30cm Ruler
Tape Measure
Pencil
Cordless drill
7mm wood drill bit
Norm's Proton pack plans available at http://www.gbfans.com/equipment/plans/norm-gagnon/
===========================================================
Following these plans and measurements. You should end up with a drawing on your 1/2 plywood like this..
http://i225.photobucket.com/albums/.....C/IMG_1041.jpg
Then of course forwarding from that the second plate 'generator cover', once measured, drawn and cut should look like this...
http://i225.photobucket.com/albums/.....C/IMG_1042.jpg
Then cut out the main 'motherboard' and sand off the edges. Cut 3 pieces of 4x2 ply into 3" lengths and then cut those through the middle to make square legs. this will make 6 legs but we only need 5. place them between the motherboard and 'generator cover' to make an even setup nice and sturdy. Once you have them placed correctly mark the underside of the generator to know where everything fits. do the same to the motherboard. then begin screwing the feet to the motherboard from behind with short thick screws (I used 1 +1/2" screws) YOU SHOULD be able to see these feet and how they are placed roughly in the last photo background.
Now once this is done, realign the generator cover with the legs you just affixed and glue the plate down with heavy wood glue such as no more nails or unibond. If needed you can add screws here but will have to fill them in later...
once done your pack should start to look like this...
http://i225.photobucket.com/albums/.....C/IMG_1044.jpg
Unfortunately due to a sudden change in ridiculous British weather we were unable to fix the gutter plastic and PVC tubing to the frame to make the casing for the generator plate. So we packed it away and I began adding the finishing touches to my uniform safely indoors :3
http://i225.photobucket.com/albums/.....C/IMG_1048.jpg
yes or no ¬.¬
General | Posted 15 years ago1. You can ONLY answer Yes or No FOOL!
2. You are NOT ALLOWED to explain ANYTHING unless someone messages/comments you and asks. And believe me, the temptation to explain some of these will be overwhelming... things are not exactly as they seem.
3. It is harder than it looks, but NO explanations !!! You will want to... but don't!!!
Kissed any one of your Facebook friends? ---Yes
Been arrested? ---No
Kissed someone you didn't like? ---no
Slept in until 5 PM? --- Yes
Fallen asleep at work/school? ---Yes
Ran a red light? ---Yes
Been suspended from school? ---yes
Experienced love at first sight? ---yes
Totalled your car in an accident? ---No
Been fired from a job? ---Yes
Fired somebody? ---No
Sang karaoke? ---Yes
Pointed a gun at someone? ---Yes
Done something you told yourself you wouldn't? ---Yes
Laughed until something you were drinking came out your nose? ---yes
Caught a snowflake on your tongue? --- Yes
Kissed in the rain? --- Yes
Had a close brush with death (your own)? ---Yes
Seen someone die? ---Yes
Played spin-the-bottle? ---Yes
Sang in the shower? --- Yes
Smoked a cigar? ---No
Sat on a rooftop? --- Yes
Taken pictures of yourself naked? ---Yes
Been pushed into a pool with all your clothes? ---Yes
Skipped school? ---Yes
Eaten a bug? ---Yes
Sleepwalked? --Yes
Walked a moonlit beach? ---Yes
Ridden a motorcycle? ---YES
Dumped someone? ---Yes
Forgotten your anniversary? ---Yes
Lied to avoid a ticket? ---no
Ridden on a helicopter? ---yes
Shaved your head? ---no
Blacked out from drinking? ---yes
Played a prank on someone? --- Yes
Hit a home run? ---No
Felt like killing someone? ---yes
Cross-dressed? ---no
Been falling-down drunk? ---Yes
Made your girlfriend/boyfriend cry? ---Yes
Eaten snake? --- yes
Marched/Protested? ---yes
Had Mexican jumping beans for pets? ---no
Puked on amusement ride? ---No
Seriously & intentionally boycotted something? ---yes
Been in a band? --- yes
Knitted? ---Yes
Been on TV? ---yes
Shot a gun? ---yes
Skinny-dipped? ---no
Caused someone to need stitches? ---yes
Ridden a surfboard? ---yes
Drank straight from a liquor bottle? ---Yes
Had surgery? --- Yes
Streaked? ---yes
Taken by ambulance to hospital? ---Yes
Passed out when not drinking? ---yes
Peed on a bush? --- Yes
Donated Blood? ---No
Grabbed electric fence? ---Yes
Eaten alligator meat? ---No
Eaten cheesecake? ---Yes
Eaten kids' Halloween candy? ---Yes
Killed an animal when not hunting? ---no
Peed your pants in public? ---no
Written graffiti? --- Yes
Still love someone you shouldn't? ---No
Think about the future? ---Yes
Been in handcuffs? ---Yes
Believe in love? ---yes
Sleep on a certain side of the bed? ---wtf?
FURBALL Runners: Start your engines...
General | Posted 15 years agoEF Draws near and as all my buddies know due to the recent loss of a job, sorting out life issues and buying a new motorbike with additional rider training I am unable to take part in either the Run or EF itself...
So I hereby conscript all of the Regiment of Lone (I'm still acting captain you know :p) To have an even better run than last year and to take as many photos and videos and keepsakes as ethically possible!
That is an Order ^^
To all others who I can not offer a legal order to I request that you do the same. Drink yourselves silly for me!
As for next time. I'll Be Back!
More Bandwagon craps XD
General | Posted 15 years agoStolen from the  little-wolf
1. Your Name:
2. Age:
3. Single or Taken:
4. Favorite Film:
5. Favorite Song or Album:
6. Favorite Band/Artist:
7. Dirty or Clean:
8. Tattoos and/or Piercings:
9. Do we know each other outside of FA?
10. What's your philosophy on life?
11. Is the bottle half-full or half-empty?
12. Would you keep a secret from me if you thought it was in my best interest?
13. What is your favorite memory of us?
14. What is your favorite guilty pleasure?
15. Tell me one odd/interesting fact about you?
16. You can have three wishes (for yourself, so forget all the 'world peace etc' malarkey) - what are they?
17. Can we get together and make a cake?
18. Which country is your spiritual home?
19. What is your big weakness?
20. Do you think I'm a good person?
21. What was your best/favorite subject at school?
22. Describe your accent:
23. If you could change anything about me, would you?
24. What do you wear to sleep?
25. Trousers or skirts?
26. Cigarettes or alcohol?
27. If I only had one day to live, what would we do together?
28. Will you repost this so I can fill it out for you?
 little-wolf
1. Your Name:
2. Age:
3. Single or Taken:
4. Favorite Film:
5. Favorite Song or Album:
6. Favorite Band/Artist:
7. Dirty or Clean:
8. Tattoos and/or Piercings:
9. Do we know each other outside of FA?
10. What's your philosophy on life?
11. Is the bottle half-full or half-empty?
12. Would you keep a secret from me if you thought it was in my best interest?
13. What is your favorite memory of us?
14. What is your favorite guilty pleasure?
15. Tell me one odd/interesting fact about you?
16. You can have three wishes (for yourself, so forget all the 'world peace etc' malarkey) - what are they?
17. Can we get together and make a cake?
18. Which country is your spiritual home?
19. What is your big weakness?
20. Do you think I'm a good person?
21. What was your best/favorite subject at school?
22. Describe your accent:
23. If you could change anything about me, would you?
24. What do you wear to sleep?
25. Trousers or skirts?
26. Cigarettes or alcohol?
27. If I only had one day to live, what would we do together?
28. Will you repost this so I can fill it out for you?
Hello Band wagon!
General | Posted 15 years agoQuit yer moaning and fill in the bloody sheet kay? XD
What if?~
● I died:
● I kissed you:
● I fell:
● I lived next door to you:
● I showed up at your house unexpectedly:
● I stole something:
● I was murdered:
● I cried:
● I asked you to marry me:
● I was hospitalized:
~Would you~
● Trust me enough to sleep in the same bed as me?
● Keep a secret if i told you one?
● Hold my hand?
● Study with me?
● Cook for me?
● Love me?
● Date me?
● Have sex with me?
~More ~
● When and how did we meet?
● Describe me in three words.
● What was your first impression of me?
● What do you think of me now?
● What reminds you of me?
● Could you see us together forever?
● When's the last time you saw me?
● Are you gonna re-post this to see what I say about you?
FOR SALE! ^^
General | Posted 15 years agoAprilia RS50 '57' Plate Motorcycle.
PRICE NEW: £2500
MY ASKING PRICE: £700
• aluminium frame
• aluminium swingarm
• lightweight wheels with ‘Y’ spokes
• radial caliper front brake
• Euro 2, two-stroke engine
• fairing based on that of the RSV 1000 R
• analog/digital instruments
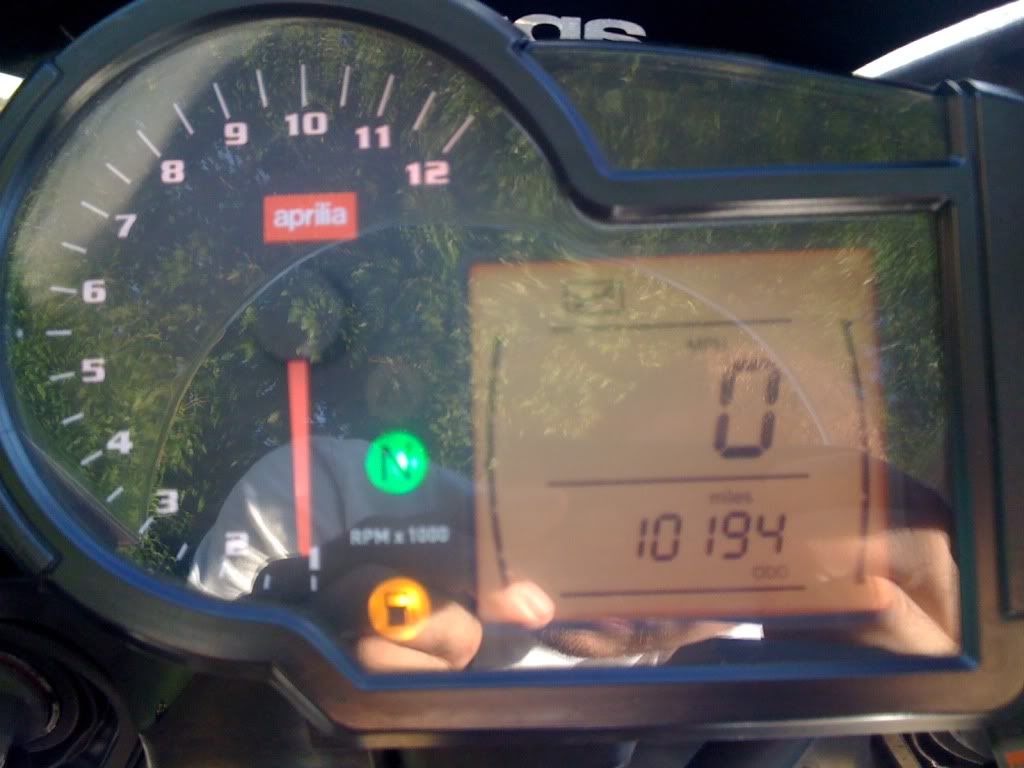
Owned for 4 years from New. 1st and only owner. Excellent runner and perfect first time bike!
MILAGE : 10194 Miles
Light Damage/repair:
=Left side fairing cracked
=Rear Brake fluid change
REASON FOR SALE:
Sizing up to Yamaha FZR Genesis 750. Will be dearly sorry to say goodbye to my Aprilia
RECENT UPGRADES/SWAPOUTS:
=New Pirelli Demon Tyres with full tread.
=New left side Wing mirror.
=New NKG Spark plug
=Recent Carb cleanout
=full suspention resistance tests completed
=New ECU Fuses
=New Battery
=New Exhaust Silencer Fitted
=New Left side Front indicator
=New rear side Drive Sprocket
=New rear Suspension action bolts
PHOTOS TAKEN TODAY (22/06/2010)
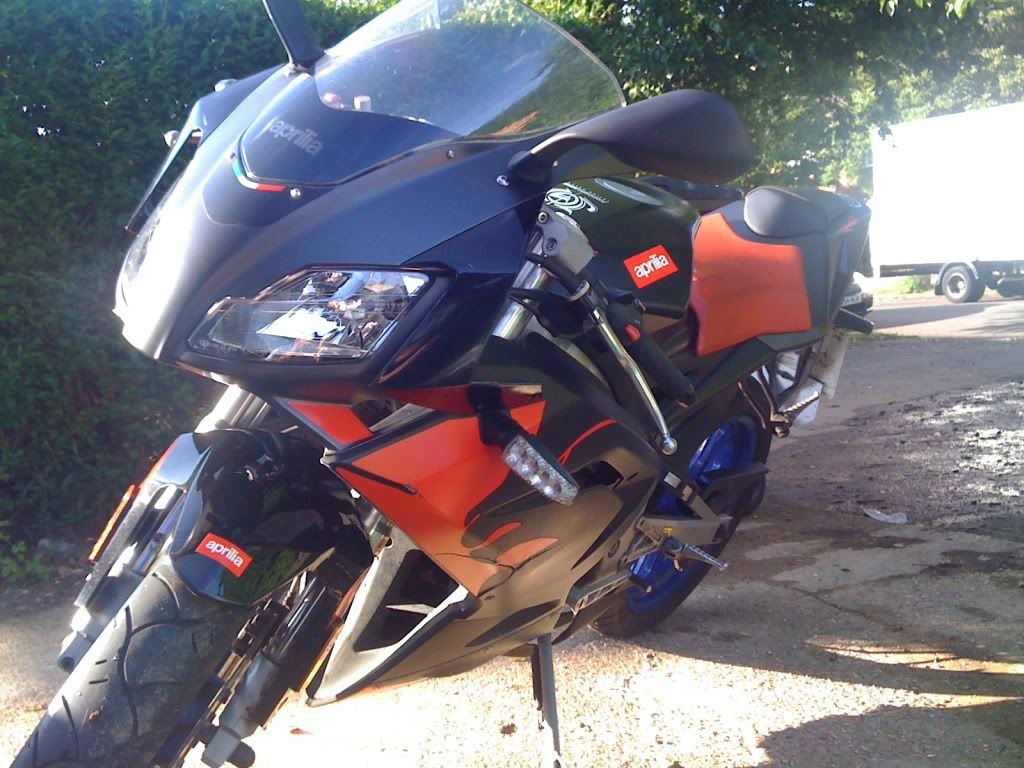
http://i225.photobucket.com/albums/.....s/IMG_0164.jpg FRONT
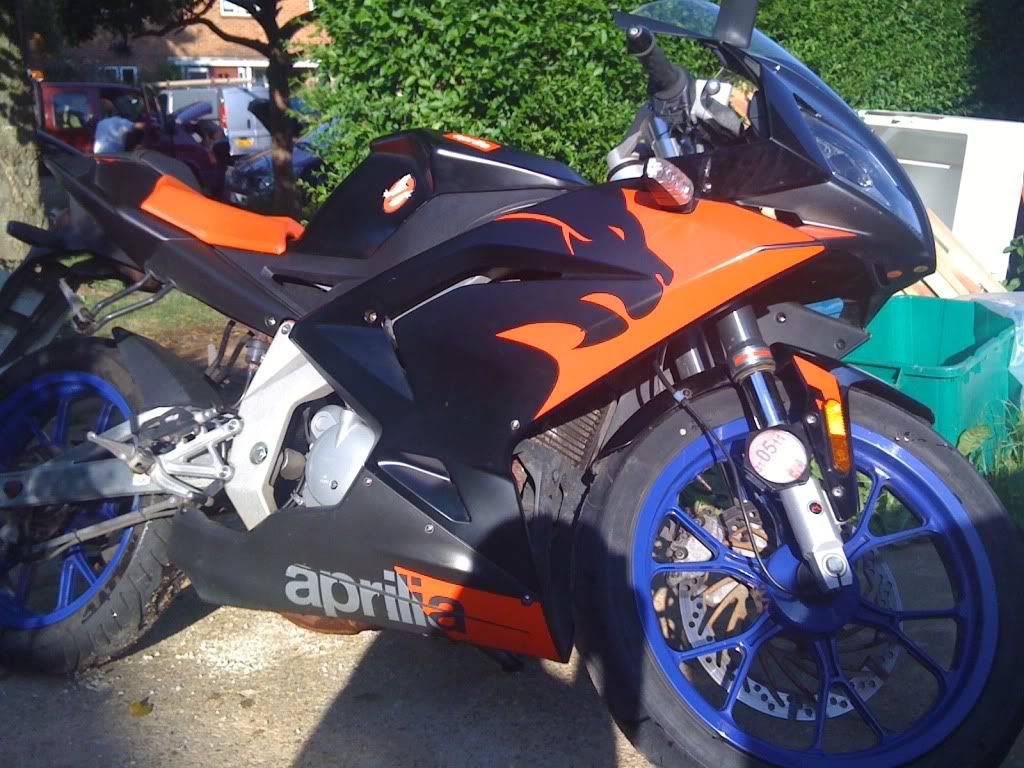
http://i225.photobucket.com/albums/.....s/IMG_0163.jpg RIGHT SIDE
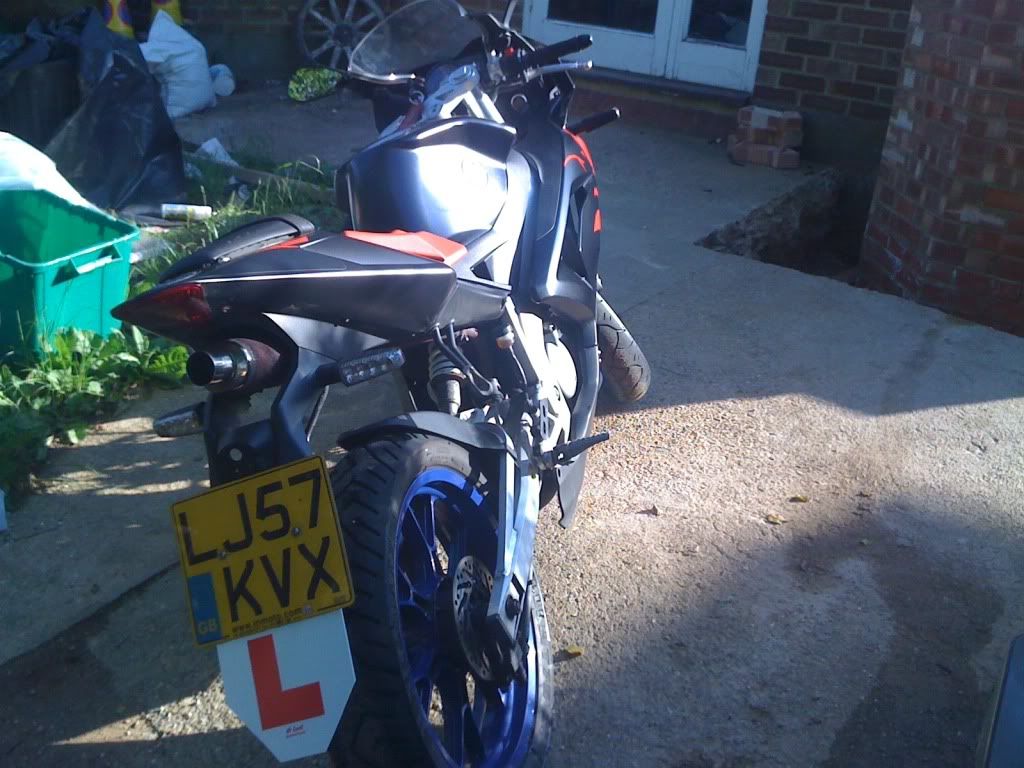
http://i225.photobucket.com/albums/.....s/IMG_0162.jpg REAR
http://i225.photobucket.com/albums/.....s/IMG_0161.jpg INSTURMENTS
TECHNICAL INFORMATION:
*
Engine: Liquid cooled, single cylinder two stroke
*
Fuel: Dell’Orto PHVA - Ø14
*
Bore x Stroke: 39,86 x 40 mm
*
Total displacement: 49,9 cc
*
Compression ratio: 11,5 :1
*
Maximum power at the crank: Electronic C.D.I.
*
Maximum torque at the crank: Electric
*
Ignition: Elettronica C.D.I.
*
Starting: Elettrico
*
Exhaust: Euro 2
*
Lubrification: Automatic mixer
*
Gear box: 6 speed. Ratios: 1st 11/34; 2nd 15/30; 3rd 18/27; 4th 20/24; 5th 22/23; 6th 23/22
*
Clutch: Multi-plate
*
Primary drive: Gears. Ratio: 21/78
*
Final drive: Chain. Ratio: 14/53
*
Frame: Aluminium twin beam frame with extruded profiles and internal reinforcement
*
Front suspension: 40 mm upside down fork; wheel travel 120 mm
*
Rear suspension: Double reinforced member aluminium swingarm with bracing arch; hydraulic monoshock; wheel travel 110 mm
*
Brakes: Front: radial caliper with two 28 mm opposed pistons; 300 mm stainless steel disc; aeronautical braided brake hose Rear: 180 mm stainless steel disc; caliper with two 25 mm opposed pistons; aeronautical braided brake hose
*
Wheels: Light alloy 6 ‘Y’ spoke wheels with tubeless rims. Front: 2.75 x 17" Rear: 3.50 x 17"
*
Tyres: Front: 110/80 - 17" Rear: 130/70 - 17"
*
Dimensions: Overall length 1965 mm Overall width 720 mm Max height at windshield 1.100 mm Seat height 810 mm Wheelbase 1,310.5 mm
*
Fuel tank capacity: 13 litres
*
Carburettor: Dell’Orto PHVA - Ø14
*
Battery: 12V – 4Ah
PRICE NEW: £2500
MY ASKING PRICE: £700
• aluminium frame
• aluminium swingarm
• lightweight wheels with ‘Y’ spokes
• radial caliper front brake
• Euro 2, two-stroke engine
• fairing based on that of the RSV 1000 R
• analog/digital instruments
Owned for 4 years from New. 1st and only owner. Excellent runner and perfect first time bike!
MILAGE : 10194 Miles
Light Damage/repair:
=Left side fairing cracked
=Rear Brake fluid change
REASON FOR SALE:
Sizing up to Yamaha FZR Genesis 750. Will be dearly sorry to say goodbye to my Aprilia
RECENT UPGRADES/SWAPOUTS:
=New Pirelli Demon Tyres with full tread.
=New left side Wing mirror.
=New NKG Spark plug
=Recent Carb cleanout
=full suspention resistance tests completed
=New ECU Fuses
=New Battery
=New Exhaust Silencer Fitted
=New Left side Front indicator
=New rear side Drive Sprocket
=New rear Suspension action bolts
PHOTOS TAKEN TODAY (22/06/2010)
http://i225.photobucket.com/albums/.....s/IMG_0164.jpg FRONT
http://i225.photobucket.com/albums/.....s/IMG_0163.jpg RIGHT SIDE
http://i225.photobucket.com/albums/.....s/IMG_0162.jpg REAR
http://i225.photobucket.com/albums/.....s/IMG_0161.jpg INSTURMENTS
TECHNICAL INFORMATION:
*
Engine: Liquid cooled, single cylinder two stroke
*
Fuel: Dell’Orto PHVA - Ø14
*
Bore x Stroke: 39,86 x 40 mm
*
Total displacement: 49,9 cc
*
Compression ratio: 11,5 :1
*
Maximum power at the crank: Electronic C.D.I.
*
Maximum torque at the crank: Electric
*
Ignition: Elettronica C.D.I.
*
Starting: Elettrico
*
Exhaust: Euro 2
*
Lubrification: Automatic mixer
*
Gear box: 6 speed. Ratios: 1st 11/34; 2nd 15/30; 3rd 18/27; 4th 20/24; 5th 22/23; 6th 23/22
*
Clutch: Multi-plate
*
Primary drive: Gears. Ratio: 21/78
*
Final drive: Chain. Ratio: 14/53
*
Frame: Aluminium twin beam frame with extruded profiles and internal reinforcement
*
Front suspension: 40 mm upside down fork; wheel travel 120 mm
*
Rear suspension: Double reinforced member aluminium swingarm with bracing arch; hydraulic monoshock; wheel travel 110 mm
*
Brakes: Front: radial caliper with two 28 mm opposed pistons; 300 mm stainless steel disc; aeronautical braided brake hose Rear: 180 mm stainless steel disc; caliper with two 25 mm opposed pistons; aeronautical braided brake hose
*
Wheels: Light alloy 6 ‘Y’ spoke wheels with tubeless rims. Front: 2.75 x 17" Rear: 3.50 x 17"
*
Tyres: Front: 110/80 - 17" Rear: 130/70 - 17"
*
Dimensions: Overall length 1965 mm Overall width 720 mm Max height at windshield 1.100 mm Seat height 810 mm Wheelbase 1,310.5 mm
*
Fuel tank capacity: 13 litres
*
Carburettor: Dell’Orto PHVA - Ø14
*
Battery: 12V – 4Ah
Trouble Ahoy
General | Posted 15 years agoThe list of non attendance grows as I step off the furball run. No EF for me this year. Money, Job andgeneral life always seems to get in the way. Maybe next year.
My love to all the buddies bahind me. Hope you have a wonderous time! bring me back something terrible XD
ManyLove.
My love to all the buddies bahind me. Hope you have a wonderous time! bring me back something terrible XD
ManyLove.
EF anyone?
General | Posted 16 years agoHey guys!
For those that know me well enough could you all shove a quick comment on the arse of this Journal detailing the following::
membership level:
Hotel room type:
Extra day/dog permits:
Attending Furball run (if running):
I would like to know as I want to tailor my visit to match everyone else, I don't wanna be the only bugger out of my mates who has extra day/supersponsor (because that would be shit-cakes)
I intend to blow a fuckload more money this time and I hope the rest of you have as little regard for money as I do XD
Many Love!
Finally...
General | Posted 16 years agoNear 5 years as a furry and I've never touched FA but of course times are a' changing and I've finally gotten my arse into gear with getting online. All there is to do now is recover any PSD files I can that werent damaged in the great fire and scan in all my sketches/crap-ches. Not sure how that is going to work with my busted scanner though...
I can't give up now! Ive come this far and my profile looks all the less noobish. If it weren't for Shadow Wolf and her wonderfully drawn likeness of me fighting the twisted evil of dark starship corridors without my helmet on then I would not be posting this so a HUGE thankyou goes out to her and everyone who has welcomed me aboard. Thanks everyone for your assistance in reducing my noob nerves heh heh.
to friends, old and new, who I hope to use FA to keep in contact with ^^