 FA+
FA+
313
Views
Views
2
Favorites
Favorites
Category
Scraps / Still Life
Species Unspecified / Any
Size 314 x 281
File Size 88.6 kB
Report this content
More from AtomicBolt

")


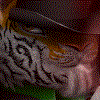
Working on a sort of big picture, and therefore need a realistic way to make tears run through fur. This is a test with a furry ball, a tear running down the ball, and a sort of combed part on the left there with the somewhat hard edge.
If anyone is interested, I can post the steps to produce this result as an image. Saved the steps for my own references. If you don't use a pressure sensitive tablet, don't even bother for these steps, since they HEAVILY rely in pressure. Basically:
1. Paint for your life! Only the color, no shades, no highlights. None of them. If you're making it furry, be sure to smudge the edges.
2. Add basic shading. Do not think about the structure of the surface (fur, stone etc), only shade it by the light source. After this step, I had a shaded sphere. No fur, no drops.
-> Hint for Photoshop-users: Create a new layer for shades, place it over the color layer, right click the shades layer and chose "Cut Mask". This uses the layer directly below as the cut mask, allowing you to paint the shade layer only where the color layer actually presents content. I blew my mind when I accidentally did this and loved it ever since.
3. Use a fur brush, chose black as color and chose pressure sensitive transparency, and paint black hair on the shades layer. The reason for that is: if you look at a furry surface, there is going to be hair close to the skin which is somewhat visible, but under and therefore in the shadow of the other hairs. You're shading these in this step. Don't go all Norris-style on them, you will barely see them later, but I found that they make it a ton more authentic.
4. Use an erasor using the fur brush once more, and again with pressure sensitive transparency. Now erase the shit out of the shades, again in a fur pattern. This will shade the hair on top of the hair in step 3, giving it a more depthy look.
-> Hint: Depending on how hard your fur brush is, you might want to use the sharpening or softening tool to create a depth-of-field-like experience, giving it a slightly more realistic touch. And by slightly I mean holy-shit-is-that-a-photo?-like. I'm no master at this since I only discovered this, but I'm sure that this is one of the keys to make it authentic.
5. Now for the mean wet-part: Decide where you want the water drop to run. Chose a black round brush with a medium-softish edge, and paint this path of the drop. Paint it daaaaark. Not #000 like dark, but pretty dark.
6. Chose the erasor and a round soft brush, about as thick as one hair strain. Then erase the just now added black color where fur should be in front of it. You see this part in my picture in the bright spot right before the path is making the curve downwards. And also erase some of the hair behind hit.
-> Explanation: When the water runs down, it pushes the hair under it's path to the skin. Depending of the fluid and the fur the water might be absorbed, but not in my case; the water drop runs down, flattening the fur which is the not on top of everything anymore, therefore putting it in the shadow of the higher hair levels.
7. Paint your drop at the end of the path. This was my first attempt, and it looks like garbage, but I'm on it.
I hope this is useful to someone out there.
Please let me know what you think, and what is keeping it from looking realistic. I didn't pay much attention to the larger undisturbed fur areas, so they might be kinda unnatural.
Category Scraps / Still Life
Species Unspecified / Any
Size 314 x 281px
File Size 88.6 kB
Comments