 FA+
FA+
920
Views
Views
57
Favorites
Favorites
Category
All / All
Species Unspecified / Any
Size 1189 x 962
File Size 185 kB
Report this content
More from Merkindesr


Listed in Folders


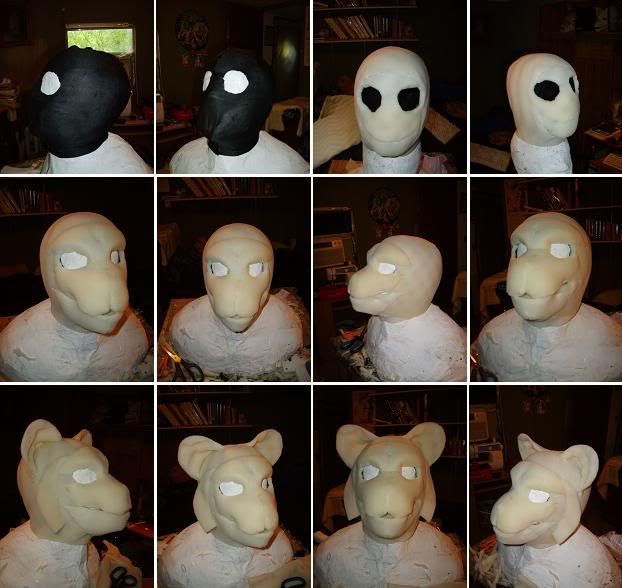
I finally got the nose and teeth casted and have attached them to the mask. I am very happy with the nose, although I think the teeth could use a slight bit of work. I might rebuild and cast them later...but for now, I think this head is ready for some action. I just don't have any place to where it till october (oklacon). maybe I'll take it up to wichita and walk around the mall or somthin...see if I get kicked out or what not...
I also did a little bit of work on the ears to make them less rounded like they were...It was a bit cartooney before, I hoped to give it more of a curve.
I also did a little bit of work on the ears to make them less rounded like they were...It was a bit cartooney before, I hoped to give it more of a curve.
Category All / All
Species Unspecified / Any
Size 1189 x 962px
File Size 185 kB
Listed in Folders


thank you.
I used a round paint pallette. http://www.furaffinity.net/view/1060048/
Look in the lower left-hand corner of the pic. I used a black see through mesh for the pupils.
I used a round paint pallette. http://www.furaffinity.net/view/1060048/
Look in the lower left-hand corner of the pic. I used a black see through mesh for the pupils.


hmmm...sell this one. i don't know about that. this is my personal suit. But I would probably have no problem making one for you. But I do have a couple of commissions to finish before I could get to it. If your not in a hurry to receive it, I may be able to start it within a month. and are you interested in just the head, or a partial?


http://i148.photobucket.com/albums/.....icheadform.jpg
Here is a pic of the basic first steps I take to muh creations.
first I take a thin breathable material and wrap a posative of my head. then cut some eye holes (and mouth if you want to...I do with mine.) then go buy a roll of that bed foam from wal-mart. (like $10 bucks for enough foam to do like 4 heads) I like to use that foam cause it is very flexible and a bit easier to breath in since the end result is so thin. and it's fricken cheap. *nods* when useing it, you might want to cut off all the little bumps and wavy llines that are on one side of the foam. the you start by making a basic single layer all around the head. (this is what I call the chameleon step {refer to link above} , cause from here you can make any animal) and as you can see from the link to the pic I have supplied, you just build up the foam piece by piece till you get your desired results. then once that is finished you can start furing it. (which is the hard part... :/ )
the eyes are an original Idea that I came up with. cheap, easy, and 3-d. it's just the small round pieces cut from a .67 cent paint pallette, (also available at wal-mart) http://www.furaffinity.net/view/1060048/
Look in the lower left-hand corner of the pic. I used a black see through mesh for the pupils. To ensure a nice clean cut, use a dremel tool to cut it.
the teeth and nose are from custom made molds I did when I was into the latex work. for help on this refer to: http://www.furaffinity.net/journal/365015/
if you have any questions just ask, I will help if I can.
=^-^=

Wrong wrong wrong! *sigh* I've been thinking wrong. I've been thinking rigid, framework, lines like that. Ok, time to step back. I still need some sort of framework to attach things to but I'm going to trim back to the minimum and go towards the foam as being structural rather than the add-on. Thanks loads, will take a look at the tutorial once I've got some zzzzzzzz.
I guess I am not 100% clear to what you are trying to say... the foam (chameleon stage) is your basic structure.
i've never liked the framework process (wires or plastic mesh) because it doesn't allow for stuctural diversatiy. what I mean by that is... if you make a basic frame to work or build off of, then the structure of the mask on the inside is permanent. and that can be bad in some cases. like if your mask were to be smashed accidently, then your inner-frame is fucked and your mask is ruined. (and imagine if your face was in there when that happened... could be fairly painful.)
I've seen people use many materials for that process, but I can't imagine why they would want to use something that isn't malleable. Just use a posative of your head made from plaster bandages you can purchase from a hobby store, or possibly wal-mart. And then start by wrapping a thin material over it so u have something to glue the foam to.
After playing around with two densities of foam I had laying around and a few other things, yep, you're absolutely right! I'm still going to use thick copper wire for a few elements though, the mouth lines to attach the teeth, jaw-line, and over the top of my head so's I can attach the steel plate mohawk. Thanks for the tips, they've made for a good 90 degree turn breakthrough.


thank you. ...and to learn how I make my eyes go to http://www.furaffinity.net/view/1481989/


Comments