 FA+
FA+
667
Views
Views
9
Favorites
Favorites
Category
Artwork (Traditional) / Tutorials
Species Unspecified / Any
Size 1280 x 407
File Size 112.1 kB
Report this content
More from TraditionalArt


Many thanks to  teakitsune for allowing us use of their tutorials!
You can find the original post here: http://www.furaffinity.net/view/11933413/
Their original description:
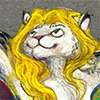
When I post my art materials list online, I almost always receive a question regarding what pastel dust is and how it is applied to my illustrations. I decided to finally sit down and create a visual sort of tutorial showing how to use it!
Materials : :
- Soft pastel sticks
- X-acto knife or razor blade
- Thick, almost stiff-bristled paint brush
- A container for the dust, or a piece of paper (I use my pastel box lid to hold my dust.)
- Kneadable eraser
Directions : :
- - - Grab some soft pastel sticks. You don’t have to purchase high-end materials for this to work. My pastel sticks shown above were probably $8-10.
- - - With your x-acto knife, scrape along the stick to create a fine dust until you have a sufficient pile. Make sure it is collected on a piece of paper or in a container.
- - - Use a somewhat thick and stiff bristled (dry) paint brush to spread the grains across the paper. You can use strokes, or scrub the color into the paper.
- - - For more saturated tones, apply more dust to the area and continue scrubbing in the color.
- - - Dab your kneadable eraser over the dust to lift away color.
- - - When finished, gently blow away any excess left on the paper.
Tips : :
- - - Pastel dust is great for tinting areas of your illustration as it can be applied over paint, color pencil, and gel pen.
- - - I suggest applying the dust after the majority of your illustration is colored and dry. Painting over such areas will create a muddy effect.
- - - The dust has a tendency to dull certain areas such as inked line work. This can be fixed by either going over the lines again (which may clog micron pens), or waiting until the illustration is finished and spraying the surface with a matte fixative. The fixative wets the dust over the lines and brings back the rich, inky black.
- - - Experiment. Play. See what blending approach works best for you and your materials!
More Information : :
- - - Pastel dust was taught to me by my illustration professor at college, who used it for many of his scientific illustrations.
- - - Along with pastel dust, I use acrylic, color pencil, micron pens and gel pen on medium weight coldpress illustration board.
- - - Use proper precautions when working with pastel dust. Some believe that without proper ventilation or a face mask, pastel dust can become hazardous to a person's health (though I have yet to find any in-depth studies to prove this.) I work with small quantities and do not wear a face mask, but I do clean up any dust particles left over on my table after I am finished. Use the amount of protection and caution you feel comfortable with while working.
If you have any questions, feel free to leave a comment! (^∇^)/
- - - - - - - - - - - - - - - - - - - - -
Artwork © Sarah Graybill
ArtTumblr
Etsy
 teakitsune for allowing us use of their tutorials!
 You can find the original post here: http://www.furaffinity.net/view/11933413/
Their original description:
When I post my art materials list online, I almost always receive a question regarding what pastel dust is and how it is applied to my illustrations. I decided to finally sit down and create a visual sort of tutorial showing how to use it!
Materials : :
- Soft pastel sticks
- X-acto knife or razor blade
- Thick, almost stiff-bristled paint brush
- A container for the dust, or a piece of paper (I use my pastel box lid to hold my dust.)
- Kneadable eraser
Directions : :
- - - Grab some soft pastel sticks. You don’t have to purchase high-end materials for this to work. My pastel sticks shown above were probably $8-10.
- - - With your x-acto knife, scrape along the stick to create a fine dust until you have a sufficient pile. Make sure it is collected on a piece of paper or in a container.
- - - Use a somewhat thick and stiff bristled (dry) paint brush to spread the grains across the paper. You can use strokes, or scrub the color into the paper.
- - - For more saturated tones, apply more dust to the area and continue scrubbing in the color.
- - - Dab your kneadable eraser over the dust to lift away color.
- - - When finished, gently blow away any excess left on the paper.
Tips : :
- - - Pastel dust is great for tinting areas of your illustration as it can be applied over paint, color pencil, and gel pen.
- - - I suggest applying the dust after the majority of your illustration is colored and dry. Painting over such areas will create a muddy effect.
- - - The dust has a tendency to dull certain areas such as inked line work. This can be fixed by either going over the lines again (which may clog micron pens), or waiting until the illustration is finished and spraying the surface with a matte fixative. The fixative wets the dust over the lines and brings back the rich, inky black.
- - - Experiment. Play. See what blending approach works best for you and your materials!
More Information : :
- - - Pastel dust was taught to me by my illustration professor at college, who used it for many of his scientific illustrations.
- - - Along with pastel dust, I use acrylic, color pencil, micron pens and gel pen on medium weight coldpress illustration board.
- - - Use proper precautions when working with pastel dust. Some believe that without proper ventilation or a face mask, pastel dust can become hazardous to a person's health (though I have yet to find any in-depth studies to prove this.) I work with small quantities and do not wear a face mask, but I do clean up any dust particles left over on my table after I am finished. Use the amount of protection and caution you feel comfortable with while working.
If you have any questions, feel free to leave a comment! (^∇^)/
- - - - - - - - - - - - - - - - - - - - -
Artwork © Sarah Graybill
ArtTumblr
Etsy
Category Artwork (Traditional) / Tutorials
Species Unspecified / Any
Size 1280 x 407px
File Size 112.1 kB
Comments