A portrait commission for
 jimdarkwolf
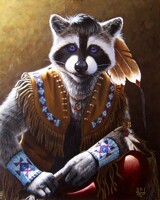
Portrait of a Dwarven Cleric
He didn't want something normal, or furry... NOooo *Rolls Eyes*... He wanted to be painted as a Dwarven Cleric... I had to do some anatomical restructuring to make him look more Dwarven then he already does. He also requested more beard/awesome action then he already has. This is what he got.
Not my best work, but not bad. This is the first painting in my life where I used 100% High Quality Walnut Binder Oils (most oils are Linseed Oil Binder), 100% Artist Quality Oils, with good quality natural bristle brushes (Hog, Mongoose, and Sable), and 100% Solvent Free (No Turpentine or Mineral Spirits), so no toxic/flammable fumes.
If I used no solvents, how did I clean my brushes? You may ask... Well, I used cheap walnut cooking oil as my brush cleaner (Diluting to paint off the brushes), then wiping them off on a rage. When the day is done, I cleaned the brushes with detergent and water.... Amazing! It actually helped restore 2 of my older kalonsky sable brushes back to an almost new state (They had grown dry and crusty from all the solvents in the past, and mild paint build up). I read about this technique over Christmas and had never heard of it before, I was skeptical, but it works, and frees me to use Oils in less ventilated or occupied places... But I digress...
18" x 24", Oils of Masonite Panel
Enjoy *Grin*
Category Artwork (Traditional) / Portraits
Species Unspecified / Any
Size 601 x 800px
File Size 128.2 kB
Its actually called the "Artists Curse",
Where many artist (Myself included) can only see the mistakes, shortcomings, and inadequacies of their work (real or imagined). I have learned to work around this condition though it has taken me many years to do so.
Thank you however, I am glad you think this is amazing *Grin*
Where many artist (Myself included) can only see the mistakes, shortcomings, and inadequacies of their work (real or imagined). I have learned to work around this condition though it has taken me many years to do so.
Thank you however, I am glad you think this is amazing *Grin*
Well it doesn't always portray them as thinkers. Most famous being the Dwarves of Tolkiens world. Not exactly the most "regal" of beings.Still, you've done this one justice and I'm thankful one of your other watchers asked a question, I was thinking. I don't doubt your skill but, I wondered if this was a live portrait because it almost breathes at some points.
Dare I ask, what this cost? Because, suddenly a scene is swimming in my mind
Dare I ask, what this cost? Because, suddenly a scene is swimming in my mind
Thank you very much *Bows*
And agreed, Dwarves by the Norse standard evolved from maggots that feed on corpse of Ymir. The giant that was killed to make the earth. So, with myths like that one can see why they get little respect.
This size and type of painting costs $430.00. All my commission info can be found here on my site: http://stickypawz.timduru.org/SPStore.htm
*Grin*
Thank you *Grin*
Yes, the commission no longer lives near me (but on the other side of the country), and getting him for live study would have been impossible, but getting him to dress up in my various Ren-Fair costume parts, and stand still for a few photos in my studio during a visit was more viable. Additionally, I work in multiple layers of Transparent Glazes and Velatura (Pronounced Vella-tora; essentially glazing with semi-opaque paint layers) this is a VERY time consuming technique (especially when not using any sort of solvent), and past the initial drawing studies, and color value sketches would not be comfortable for the subject. The great thing about photos is they allow me to work independent of time constants.
My process, starts with drawing out the composition (usually in graphite), then sizing it up to the canvas size, like this: http://www.furaffinity.net/view/12550154/. After that I transfer the sketch onto the canvas (I have numerous techniques for this), then I seal the drawing on to the canvas usually with matt acrylic medium. Followed by a Imprimatura (Pronounced: im-pree-muh-tur-uh) layer, which leave the canvas slightly toned with a soft or warm neutral color (to take the bite off the white of the gesso), this can be done in acrylic or oils. Next I apply a tonal layer like this: http://www.furaffinity.net/view/12597264/. This is done with Raw or Burnt Umber 90% of the time. And the set is now complete.
The next step is usually either a Grisaille (Pronounced: griz-zai; a monochromatic oil painting which is often used in under-paintings),or the first layer of the Velatura. Once that layer is dry (1-3 days if I use Alkyd or Liguin fast drying mediums), I apply numerous glazing or Velatura layers to adjust the colors, and details. This can be as few as 2, or as many as a dozen or more. Upon last layer, I set the painting aside to cure for 1-3 months, at some point I will Oil-out the painting (giving it a even semi-gloss finish), then once that is cured I'll apply Damar Varnish, which seals and protects the painting. If all is done right the finished product should be very luminous, and last for hundreds of years (if taken care off).
Any that in a thimble is my process. *Grin*
That's amazingly detailed; quite the labor of love and passion for your craft.
When I saw the Jan Lievens exhibit, when it came through the United States and stopped in Milwaukee, they had several examples on display of his multi-layer technique. In fact, your description -your detail in telling me about the layers of color and the effects of each- reminded me of some of the museum's descriptive plaques. I have never had the passion you clearly possess but my hope is to keep fanning the flames of my love of writing.
I really enjoyed seeing the earlier sketch and the tonal layer.
In fact, the more I look at it, the tonal layer reminds me -just a bit- of an old tin-type. That umber wash, the bronze tones, are lovely. That, too, is getting added to my "faves".
I would hope you have had a gallery showing with your work. You really have an amazing talent! Thank you for sharing it!
The photos never do...
Tho, I have to say that this is one of the best photos of any of my paintings. Which was weird I spent hours taking photos and they all sucked. Went and had lunch and Hung out with Daro for a while then at the last of the days light and only with my studio lamps I tried one more time knowing it wasn't enough light or the right tone. It should have come out all grainy, and dark, and heavy with orange light... Nope... Came out like this.
I am not photographer, and I have no understandings!
Thanks *Grin*
Holy !!! The detail, the textures, the lighting...and also finding a way to use oil without all the harsh chemicals...AWESOME!! I used to prefer oils over acrylics from the start...but had to stop using them due to the chemicals and not really having an area where I could work that little four legged critters wouldn't get into the harsh materials....but I am definitely going to have to looking the walnut oil.
Thank you for sharing the info and for showing your beautiful work. Truly inspiring. <3
Thank you for sharing the info and for showing your beautiful work. Truly inspiring. <3

 FA+
FA+


Comments