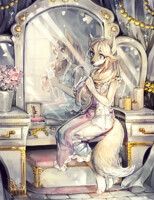
Summer Sun commission for chocoeva
Thank you so much for letting me use your character as a guinea pig for my next theme! 8)))
Thank you so much for letting me use your character as a guinea pig for my next theme! 8)))
Category Artwork (Digital) / Portraits
Species Dog (Other)
Size 714 x 924px
File Size 991.6 kB
fjdlaf oh my gosh sometimes I luck ouT LIKE W/ HER I already had an image like as soon as I looked at her
sometimes, though, I end up sketching out like 2094830 things before I decide what I wanna do o<-<
Thank you so much aaa aND THANK YOU AGAIN for buying as well! <3
sometimes, though, I end up sketching out like 2094830 things before I decide what I wanna do o<-<
Thank you so much aaa aND THANK YOU AGAIN for buying as well! <3
WOW! Hey can I ask how you do you colours? What are your layers like? This is so beautiful :)
I would love a chance to inspect the photoshop document (assuming it's a PSD!).. Would there be a chance I could have a peek at it some time?
No worries if not! It's beautiful :)
I would love a chance to inspect the photoshop document (assuming it's a PSD!).. Would there be a chance I could have a peek at it some time?
No worries if not! It's beautiful :)
Hi! Sorry about the delayed reply! /didn't see your comment previously
Unfortunately giving you a PSD file wouldn't help any w/ how I paint since I merge everything as I go. ;w;
I can give you a basic rundown of what I do tho!
Let's see... I use SAI, and these are my main tools: http://33.media.tumblr.com/087799e8.....87bo1_1280.png
I start w/ a super rough and light sketch, then I'll make another layer and use the airbrush tool to go over it again as a more refined/detailed/solid sketch. UM, on SAI there is a layer mode type that on some versions is called Shade, on mine is like Ao%e% or something weird like that, and some versions don't even have @_@ I forget what it's called on photoshop, but it's similar to multiple but w/ more vibrant colors. Anyway, I'll set the refined sketch to that over the rough sketch--it makes overlapped areas darker. It's not necessary, but I like the effect. After that I'll have another layer set to Shade which I'll color all the flats on (I paint bucket it w/ one color as a base for the tone, then I use the Ol Water or Water tools to put in the colors). Above that I'll have a bunch of random layers set to overlay blend mode (and maybe multiply or addition)--which I use the Water tool with, and just tint areas for warmer/lighter lighting, or cooler tones. Once I'm happy w/ the colors I merge everything and then use the Ol Water and Brush tools to paint.
In the end I may add another overlay layer or two depending on if I feel it needs more poppy colors.
After that I put it through Photoshop and there I play w/ the adjustment options (levels, color balance, vibrancy, etc) until it just looks perfect. There's no one true way here, it's honestly just me dicking around until I see something I like.
Ahhh I hope that helped out! Maybe on my next one I'll try to save all the layers of it to show the steps fd;ksa and if I can remember I'll send it to you.

 FA+
FA+


Comments