 FA+
FA+
455
Views
Views
3
Favorites
Favorites
Category
Fursuiting / Tutorials
Species Unspecified / Any
Size 792 x 594
File Size 77 kB
Report this content
More from lunarwolf


Listed in Folders

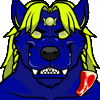
Ok m'lil' fur-buddies... thought I'd share some'a the progress That I've also been workin' on ta get it ready fer m'fursuit... is Lunarwolf's diadem (the symbol that adorns his brow) an so thought I'd share a lil' how-to ta some'a you other suiters who might be intrested in such projects... (I have noticed there's at least a few other furres who have glowy-type symbols/emblems adornin' their heads/bodies so here's how ya can make one :)
you'll need the scupltin' putty/clay like ya saw in the previous pic of course... now comes makin' the mold (the master was shown previously), some resin and colorin' agent/paint (fer however ya wanna color yer diadem. LED strands (7 ft. yellow & white used fer this)
The resin I use is clear with a slight blue-ish tint by itself when dry so if ya go this route be sure ta adjust yer color accordingly.
After I've set the mold an got the right color consistency ta my first layer of resine it was placed in the mold an left there ta dry
the resine filled this mold only halfway. If needed, use more sculpty ta 'shore up/heighten yer mold ta give it more depth.
A second, larger amount/thicker layer I added ta this, but only added just a bab of the color used so that this wider layer will be much more opaque. When this layer had dried I then bent the strand of LEDs to the necessary shape then laid this across the resin. (again shore up mold if needed) then added a 3rd smaller layer of resin, this time clear, to the mold to secure the LEDs.
Lastly, a 4th. thinner layer was used ta top it all off, mainly to make sure all exposed wiring was covered. Let all this set and cure (I did this yesterday so m'waitin' till tomorrow ta pull it from the mold...
...an there ya have it... will post 'nother pic after it's free of the mold an operatin' :)
Category Fursuiting / Tutorials
Species Unspecified / Any
Size 792 x 594px
File Size 77 kB
Listed in Folders


Comments