
#A#
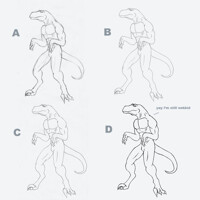
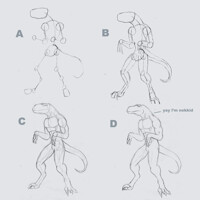
When you want to colour a picture that you have ink or done in pencil, the picture that you scan maybe not clear or blur. So to make your picture more clear for you to colour, go to Image tab at photoshop --> select Levels and then the Level tool box will appear, from there select the 2 side bar to adjust the colour brightness and darkness. I didnt show you this because i want you to have some experince in playing around with that until you got a good dark line images like the one i done.
#B#
Then after that is done, go to the Layer option and click the button like paper lift up a little to the side. After you click that you have created a new layer to the above the orignal of the picture which will be name as "Layer 1", select that layer and then click the pull down menu at the top to select the option "Multiply". By doing so if you colour something to that new layer, the colour will not cover up or erased your picture, try to colour the whole picture or use paint bucket to colour the scene of the new layer. I use green as a background colour.
#C#
Select back to your original picture that is not coloured by the background and select "Magic Wand Tool" short cut key is "w". When you done so, click the above button looks like two square stick together, by doing so you can select multiple part of the image that you want to colour to the character, else if not it just let you select one part only. After you have selected the part that you wanted to colour to the character, go back to the layer option and select back the the layer you have colour for the background and use paint bucket to colour the character that you have selected.
#D#
Now to make shading, pick the colour which is darker then the original character colour because we need to add some shadow to the character. Use a brush which is the side is slightly blur then the fully clean circle dot. After that do your stuff with the shadow of the character. Some people like to make the lighting first but is the same doesnt matter which one start first. Oh by the way dont diselect the area that you have selected for the character, we still need it to so you wont be colouring out of the character area. You can hide the selected area blinking by "ctrl + h".
#E#
After you done with the shadow, now the time to do with the lightning effect. First choose the "Dodge tool", you can adjust the exposure so it wont be too bright and then do your stuff with the bright erea of the character.
#F#
Is the same thing i done in step "E" but this time i select the "Burn Tool" to make the shadow slightly abit darker, if you cant find it try hold down on the "Dodge tool" until it pop up some new selection.
#G#
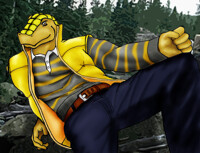
Well this is the final step and also the fun step, as you can see the character looks kinda empty and plain rite? Hehe is time to give thie lizard some new look. First you make another layer on top of the colour layer and select it. Then the rest is up to you want to put up some stripes or stains or spots to the character. Have fun and experiment with it until you like it.
I have done 3 example for you to see, just let your imagination run wild for this because i know there is alot of different dino out there, hehe maybe you can come up something new :)
Category Artwork (Digital) / All
Species Unspecified / Any
Size 900 x 7686px
File Size 1.32 MB
I used to use dodge and burn, but sometimes it dodn't give me exactly the effect I wanted. It seemed a bit like cheating, and it made everything I coloured look like it was made of plasticine. Now I colour with actual colours.
Usuaully I colour a secontion one solid colour first and then add darker coloured shadows and lighter coloured highilights but other times I start with it all white and just add darker and darker colours until I get the shading I want.
Usuaully I colour a secontion one solid colour first and then add darker coloured shadows and lighter coloured highilights but other times I start with it all white and just add darker and darker colours until I get the shading I want.

 FA+
FA+





Comments