 FA+
FA+
8886
Views
Views
217
Favorites
Favorites
Category
Flash / Vore
Species Unspecified / Any
Size 512 x 527
File Size 6.43 MB
Report this content
More from Flixard
 Snacktime")
 Foxes Win")

 Greedy by Velociawesome")

 Your impending trip by Velociawesome")
Flash submissions are emulated via Ruffle. Ruffle is currently in development and compatibility is not guaranteed. Click here for more info.

Geez, I can never thing of what to write here other than a litany of excuses and apologies. There was so much sliding in this, it was crap. I made the mistake of using a pre-built skeleton (I had to map it myself), which ended up being the source of endless crap. Then, at the end, the version I upload was much more compressed than I'd like. FA only lets me upload 10 megs when the good file is 15 megs.
Even the icon is crap. I don't have a copy of photoshop so I just tossed something together in Blender and exported it as a .gif
Funny story, the macro scalie was originally going to be named Ty. Before I RPed as a fox, I used to play as an anthro Tyrannosaurs Rex who wore biker gloves and a backwards baseball cap. In my defense of that design, I came up with it when I was 12, and it was still the 90's back then.
Oh, and before anyone asks, I used Blender 2.65
...ok I'll shut up now.
(Update) Guys I uploaded a better version over here: http://aryion.com/g4/view/233321
Category Flash / Vore
Species Unspecified / Any
Size 512 x 527px
File Size 6.43 MB


I'm always hoping for more animations of this guy. He's such an adorable predator!
I'm suddenly reminded of those animations of him you did oh-so-many years ago, which I think are what caused me to discover you.
Anyway! About the animation itself... I really liked it! It's very smooth, the bulges are very nice looking (Especially the throat bulge |3) and overall, it has a very nice feel to it. :> Job well done. I want to see more, definitely.
heh, yeah... I remember those too. I made those in... jeez 2004? Wow, almost 10 years ago.
Koku still has that sticky tongue, he just didn't use it in this animation.
I MIGHT make another one with him. I mean, I did all the work of modeling, shading, and rigging him, it'd be a shame to toss that all aside. His rig is fine for eating people, though. But not for rotoing a bit and turning into prey. I need a special prey rig to follow the pred's esophagus (that's what I did before.)


Another stunning 3D animation from you Flixard, the low quality the video in dosent take away from the amount of work and detail you put into this, yet again those smooth realisitc looking bulges that show going down the throat and in the belly are amazing and ive never seen a vore animation with such smooth 3D bulges like that and smooth framing as well so far. I especially loved that large sliding bulge in the belly near the end, I was kind hoping their would be more struggling bulges in the belly but I can see how much work you put into the full swallowing animation and you did show off the belly bulging in the end so its all great, im guessing you like the swallowing process and throat bulges more? =P
I'm impressed again and really hope you keep making these animations, I didnt think your 2D animations from 2004 could get any better and you said you wouldent be making anymore cas they where so hard and took so long to make but then you come out with these mind blowing 3D animations, you really are random.. in a good way. =P
Always a fan~


I was going to use some really fancy Cycles lights instead of the standard Blender ones, but I just don't have the computer for it. Rendering one frame took almost a quarter the amount of time as rendering the whole animation. At a certain point, I just wanted to have this thing DONE y'know?


In my case, although I could say I'm quite experienced with Blender and know most of its features, I still wouldn't know how to make bulges like that. A round swell that comes and goes is easy, but correct imprints of another shape are more problematic. Cloth physics would work, but that wouldn't do on a character mesh. Need to ask the Blender team how to achieve that... will certainly need it for things I'll be doing :)
I used pushcast modifiers. I believe that the person who originally implemented them was https://www.furaffinity.net/user/imaginaryz


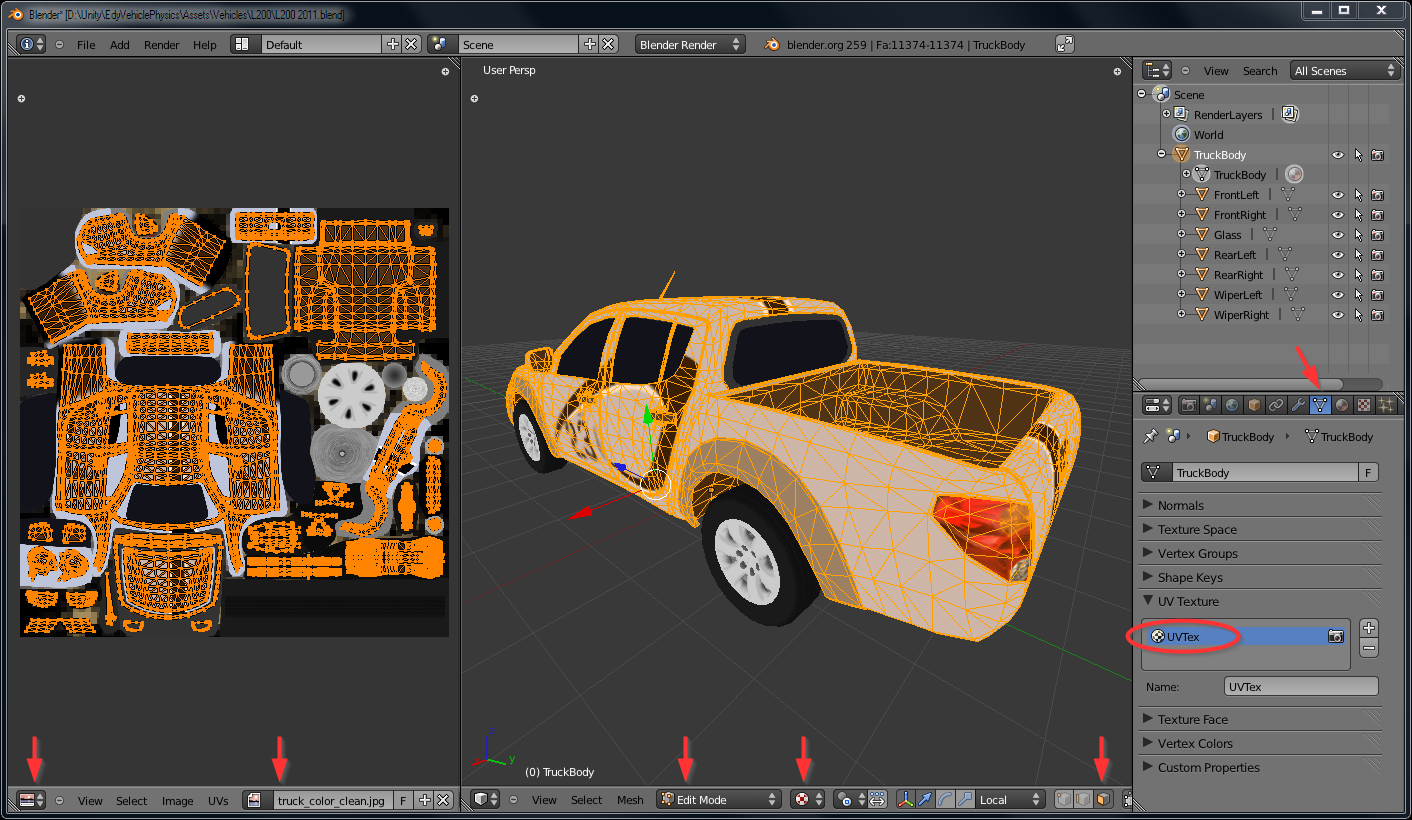
It's not too tough, but it is annoying. Basically you have to take your 3D model and unfold it so that the polygons fit more or less on a 2D plane. U and V reffer to an extra set of coordinates that each polygon must thus have (U, V, and X, Y, and Z) Then you lay a picture on top of the 2D plane (photoshop has tools for this) which will then detail what color each pixle of each polygon in 3D space should be. UV mapping is largely automated, but it's still more art than science. You want to avoid "seams" between polygons (where you have to split polygons apart to make space) without stretching the polygons too much.
http://www.edy.es/dev/wp-content/up.....UV_Mapping.png
http://www.edy.es/dev/wp-content/up.....UV_Mapping.png
Are you still having trouble with that? I'm sure there are plenty of blender tutorials on Youtube. https://www.youtube.com/watch?v=v7h.....mp;amp;index=8 was the one I liked the best.


Comments