 FA+
FA+

So sharp it cuts.
14 years ago
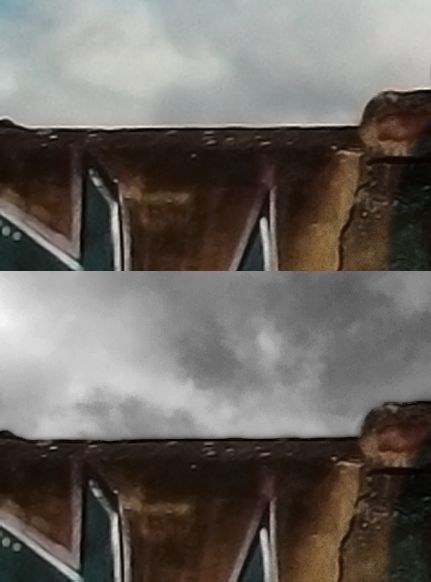
I was looking at http://www.furaffinity.net/full/6430125/ which is a great work but I noticed something a lot of 3d artists do that I know a fix for so I thought I would share. It's a compositing trick I learned a while back. I made this image to demonstrate what I'm talking about.
http://img.photobucket.com/albums/v....._2700_1350.jpg
Along the top of the wall in the original work there is a line a few pixels thick of white fringe where the image was sharpened at some point. This pits the wall against the skyline in sharp contrast and distracts from the subject of the work.
To fix this while you are compositing the image open Photoshop, select the offending layer and at the top menu go to Layer>Matting.
There are three options commonly available with any image.
* Defringe - This lets you just shave off how ever many pixels you choose from the border of the layer.
* Remove white matting - This will attempt to shave off only pixels which are common with white noise distortion.
* Remove black matting - This will do the same but for black pixels.
In -most- cases I run white, then black. Some times if the color information is damaged I do it manually but it really depends on what looks best on the piece you are composing try them all out. So now you have your layer all free of distortion but if you leave it like that then you will have a very sharp cut from one layer to another. It will make the transition between images look unnatural so part two of the trick is...
Duplicate the layer you just removed the frindge of, put it under the one you just worked on. Name the new layer Blur_2px because that is what you are going to do to it. You take that layer and use Filter>Blur>Gaussian Blur. Blur the layer by 2 pixels. Because it is under the visible layer it just becomes a transition which goes from your sharp clear image to the background.
If you have a REALLY high def image you are working on you can duplicate the main layer again, put that one under the Blur_2px and make it a Blur_4px but set the fill to 50% so you get a truly gradual transition from one composite layer to another. In most cases Blur_2 is enough.