 FA+
FA+
Ghostbustin' for Halloween? [Stage 1]
13 years ago
As stated in the title I have a screen accurate style Ghostbusters uniform with Proton pack in the works. I figured I should update it's progress via this here journal.
First off: BUDGET--
Not a cheap project I'll admit but certainly a rewarding one. I estimated the entire build to cost roughly £400
MATERIALS for Stage 1--
1 Sheet of marine Plywood @ 1/2" thickness
1 Standard length of 2x4 Plywood
1m of 2inch PVC pipe (white)
1m of 1inch PVC Pipe
1/2m squared plastic gutter sheeting
TOOLS for stage 1--
electric Jigsaw with spare blades
1800w Electric Chop Saw
Large Protractor
Long spirit level or straight edge.
30cm Ruler
Tape Measure
Pencil
Cordless drill
7mm wood drill bit
Norm's Proton pack plans available at http://www.gbfans.com/equipment/plans/norm-gagnon/
===========================================================
Following these plans and measurements. You should end up with a drawing on your 1/2 plywood like this..
http://i225.photobucket.com/albums/.....C/IMG_1041.jpg
Then of course forwarding from that the second plate 'generator cover', once measured, drawn and cut should look like this...
http://i225.photobucket.com/albums/.....C/IMG_1042.jpg
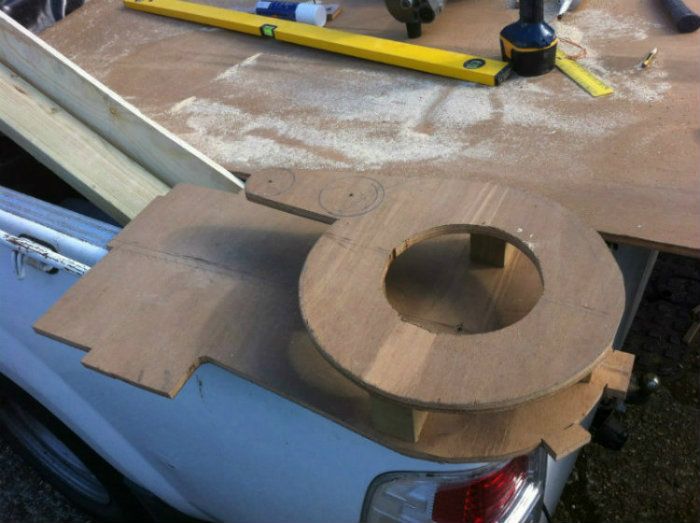
Then cut out the main 'motherboard' and sand off the edges. Cut 3 pieces of 4x2 ply into 3" lengths and then cut those through the middle to make square legs. this will make 6 legs but we only need 5. place them between the motherboard and 'generator cover' to make an even setup nice and sturdy. Once you have them placed correctly mark the underside of the generator to know where everything fits. do the same to the motherboard. then begin screwing the feet to the motherboard from behind with short thick screws (I used 1 +1/2" screws) YOU SHOULD be able to see these feet and how they are placed roughly in the last photo background.
Now once this is done, realign the generator cover with the legs you just affixed and glue the plate down with heavy wood glue such as no more nails or unibond. If needed you can add screws here but will have to fill them in later...
once done your pack should start to look like this...
http://i225.photobucket.com/albums/.....C/IMG_1044.jpg
Unfortunately due to a sudden change in ridiculous British weather we were unable to fix the gutter plastic and PVC tubing to the frame to make the casing for the generator plate. So we packed it away and I began adding the finishing touches to my uniform safely indoors :3
http://i225.photobucket.com/albums/.....C/IMG_1048.jpg
First off: BUDGET--
Not a cheap project I'll admit but certainly a rewarding one. I estimated the entire build to cost roughly £400
MATERIALS for Stage 1--
1 Sheet of marine Plywood @ 1/2" thickness
1 Standard length of 2x4 Plywood
1m of 2inch PVC pipe (white)
1m of 1inch PVC Pipe
1/2m squared plastic gutter sheeting
TOOLS for stage 1--
electric Jigsaw with spare blades
1800w Electric Chop Saw
Large Protractor
Long spirit level or straight edge.
30cm Ruler
Tape Measure
Pencil
Cordless drill
7mm wood drill bit
Norm's Proton pack plans available at http://www.gbfans.com/equipment/plans/norm-gagnon/
===========================================================
Following these plans and measurements. You should end up with a drawing on your 1/2 plywood like this..
http://i225.photobucket.com/albums/.....C/IMG_1041.jpg
Then of course forwarding from that the second plate 'generator cover', once measured, drawn and cut should look like this...
http://i225.photobucket.com/albums/.....C/IMG_1042.jpg
Then cut out the main 'motherboard' and sand off the edges. Cut 3 pieces of 4x2 ply into 3" lengths and then cut those through the middle to make square legs. this will make 6 legs but we only need 5. place them between the motherboard and 'generator cover' to make an even setup nice and sturdy. Once you have them placed correctly mark the underside of the generator to know where everything fits. do the same to the motherboard. then begin screwing the feet to the motherboard from behind with short thick screws (I used 1 +1/2" screws) YOU SHOULD be able to see these feet and how they are placed roughly in the last photo background.
Now once this is done, realign the generator cover with the legs you just affixed and glue the plate down with heavy wood glue such as no more nails or unibond. If needed you can add screws here but will have to fill them in later...
once done your pack should start to look like this...
http://i225.photobucket.com/albums/.....C/IMG_1044.jpg
Unfortunately due to a sudden change in ridiculous British weather we were unable to fix the gutter plastic and PVC tubing to the frame to make the casing for the generator plate. So we packed it away and I began adding the finishing touches to my uniform safely indoors :3
http://i225.photobucket.com/albums/.....C/IMG_1048.jpg

J_Dawg
~jdawg
DUDE THIS IS FUCKING AMAZING!

KIGENSABER
~remusshadowcast
OP
DUDE! YOU ARE FUCKING AMAZING!!